8028 - Telefon Select Sound - Gratis brugsanvisning og manual
Find enhedens vejledning gratis 8028 Select Sound i PDF-format.

Brugerspørgsmål om 8028 Select Sound
0 spørgsmål om dette apparat. Besvar dem du kender, eller stil dit eget.
Stil et nyt spørgsmål om dette apparat
Download vejledningen til din Telefon i PDF-format gratis! Find din vejledning 8028 - Select Sound og tag din elektroniske enhed tilbage i hånden. På denne side er alle dokumenter nødvendige for brugen af din enhed offentliggjort. 8028 af mærket Select Sound.
BRUGSANVISNING 8028 Select Sound

natural_image
Red geometric logo with interlocking shapes (no text or symbols)SELECT
S O U N D

natural_image
Black office telephone with a cord and keypad, displaying a digital screen (no visible text or symbols on the device body)Manual de usuario
"Léase este manual antes de operar el equipo"
Teléfono Alámbrico
8028
PÓLIZA DE GARANTÍA
IMPORTADORA MIZCO S.A. DE C.V.
ANTONIO M. RIVERA #26 BODEGA 9 CENTRO INDUSTRIAL TLALNEPANTLA CP 54030 TLALNEPANTLA DE BAZ, EDO. DE MEXICO, MEXICO. TEL.: 55-65-74-90 y 55-657519 R.F.C.: IMI161007SY7
IMPORTADORA MIZCO S.A DE C.V. Garantiza el producto adquirido por el término de un (1) año, en todas sus piezas y componentes así como mano de obra por cualquier defecto de fábrica a partir de la fecha de adquisición sin costo adicional para el consumidor.
CONDICIONES
- IMPORTADORA MIZCO S.A DE C.V. Se compromete a reparar el producto sin costo alguno al consumidor, si la falla que presenta es de fábrica.
Los gastos de transportación que se deriven de su cumplimiento serán cubiertos por IMPORTADORA MIZCO S.A. DE C.V, dentro de su red de servicio. - El tiempo de reparación en ningún caso será mayor a 30 días contados a partir de la recepción del producto en cualquiera de los sitios donde pueda hacerse efectiva la garantía.
- Para adquirir partes, refacciones, componentes, consumibles y accesorios acudir al domicilio descrito al principio. Para hacer efectiva la garantía usted debe de presentar esta póliza debidamente sellada y llenada por la tienda, junto con el producto en el centro de servicio que se indica a continuación o en la tienda donde adquirió el producto:
| IMPORTADORA MIZCO S.A. DE C.V.Antonio M. Rivera #26 Bodega 9Centro Industrial Tlalnepantla C.P. 54030Tlalnepantla de Baz, EDO. DE MEXICO, MEXICO.TEL.: 55-65-74-90 y 55-657519R.F.C.: IMI161007SY7 | SELLO Y FIRMA DE LA TIENDA |
| PRODUCTO:TELÉFONO | SERIE No.: |
| MARCA:SELECT SOUND | MODELO:8028 |
| NOMBRE DEL CLIENTE: |
| DIRECCIÓN: |
| FECHA DE COMPRA: |
ESTA GARANTÍA NO ES VALIDA EN LOS SIGUIENTES CASOS:
- Cuando el producto se hubiese utilizado en condiciones distintas a las normales.
- Cuando el producto no hubiese sido utilizado según el instructivo.
- Cuando el producto hubiese sido alterado o reparado por personas no autorizadas por el fabricante, importador o comercializador responsable.
INTRODUCCIÓN
Gracias por su compra de nuestro Teléfono Alámbrico (ID Phone).
Este manual está diseñado para familiarizarse con este teléfono.
Para aprovechar al máximo su nuevo teléfono, le sugerimos que lea detenidamente este manual de instrucciones antes de utilizarlo.
INSTRUCCIÓN DE SEGURIDAD
Cuando use su equipo telefónico, siempre deben seguirse las siguientes precauciones básicas de seguridad para reducir el riesgo de incendio, descarga eléctrica y lesiones a personas:
- Lea y entienda todas las instrucciones
- Siga todas las advertencias e instrucciones.
- Desconecte el producto de la toma de corriente antes de limpiarlo. No usar limpiadores líquidos o en aerosol. Utilice un paño húmedo para la limpieza.
- No coloque este producto en un carrito, mesa o mesa inestable. El producto puede caerse, causando graves daños al producto.
- No sobrecargue los enchufes de pared y los cables de extensión ya que esto puede resultar en un riesgo de incendio o descarga eléctrica.
- Nunca introduzca objetos de ningún tipo en este producto a través de las ranuras de los gabinetes ya que pueden tocar puntos de voltaje peligrosos o cortocircuitar partes que podrían resultar en un riesgo de incendio o descarga eléctrica. Nunca derrame líquido de ningún tipo sobre el producto.
- Evite usar esta unidad durante una tormenta eléctrica, mueva o desconecte la unidad, puede haber un riesgo remoto de choque eléctrico por relámpagos y truenos.
- Las personas no autorizadas no pueden abrir ni reparar si hay un defecto en la unidad. Esto anulará la garantía, por favor envíe a un centro de servicio autorizado para su reparación.
CARACTERÍSTICAS
- Manos libres
- Pantalla LCD con luz de fondo, alarma, hora y fecha
- Candado con opción para bloquear llamadas salientes de larga distancia y celular (044, 001, 01, 01-800)
- Memoria para 50 llamadas entrantes y 14 llamadas salientes
• 16 tonos para llamadas entrantes - Función de no molestar
• Volumen de tono ajustable - Función de tono o pulso
• Remarcar, pausa y flash
• Tono de llamada en espera
• Memoria para 10 contactos
• 3 contactos de marcado rápido
• Volumen adjustable para altavoz y auricular - Indicador luminoso de llamada entrante
• 3 funciones de alarma
• Tiempo de flash ajustable - Función anti ladrón
- Código de área y configuración del código PABX
• 5 Niveles de brillo LCD ajustable
• 1 Grupo auto IP y un grupo de configuración IP manual - Pre marcación, edición y función de marcación posterior
GUÍA DE INICIO
Enchufe el cable enrollado en el enchufe modular del auricular y enchufe el otro
extremo en el conector del lado izquierdo del teléfono. Enchufe el cable de línea en el conector de la parte trasera de la base del teléfono, el otro extremo del cable de línea es para conectar el enchufe de pared de la línea telefónica.
LOCALIZACIÓN
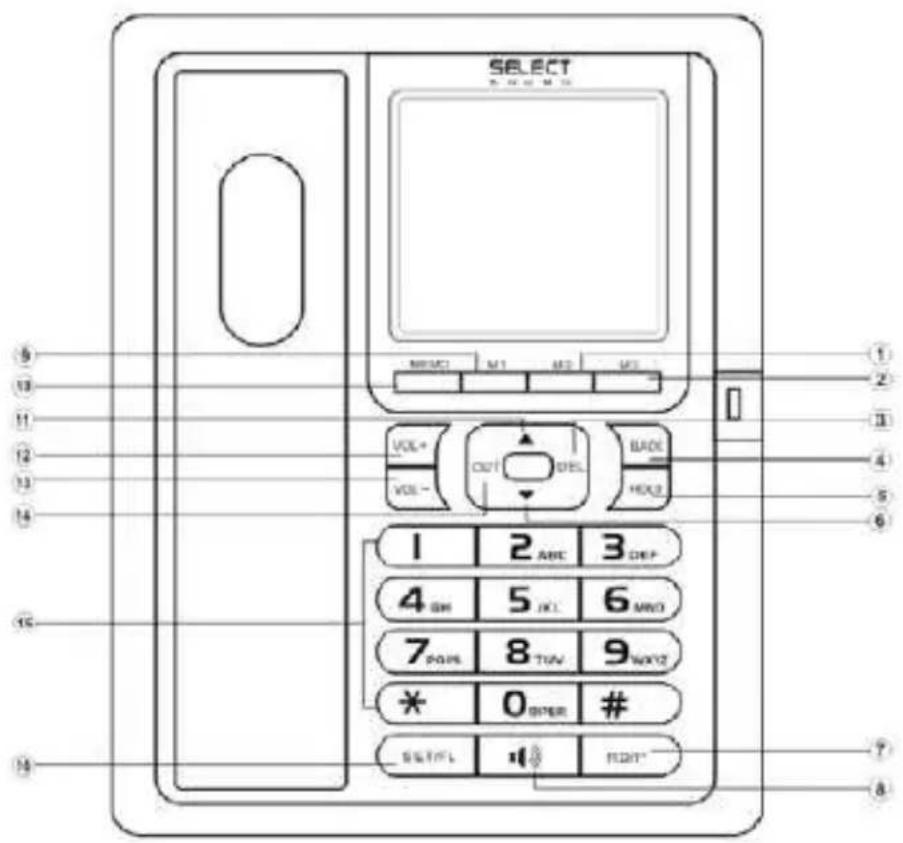
① M2
5 HOLD
⑨ M1
⑬ VOL-
② M3
6 DOWN
10 MEMO
14 OUT
③ DEL
7 RD/P
11 UP
15 NUMERICAL KEY
④ BACK
8 H.F
12 VOL +
16 FL/SET
DESCRIPCIÓN DE FUNCIÓN Y OPERACIÓN MENÚ
En el estado de colgado, presione la tecla FL / SET para entrar en el estado de ajuste, la pantalla LCD, el número de 12345678 está estableciendo opinión, presione el número deseado y presione la tecla DEL para editar el dígito equivocado. Pulse la tecla FL / SET para confirmar y pulse la tecla DEL para ir al menú superior.
Ajuste de la fecha y la hora
- En el estado de colgado.
- Presione la tecla FL / SET, la pantalla LCD
- Pulse la tecla 1, la pantalla LCD 1-DATE, 2-CL.
Pulse la tecla 1, el dígito de "fecha" parpadea, introduzca la fecha presionando la tecla numérica directamente y luego presione la tecla FL / SET para confirmar. Si el dígito es incorrecto, presione la tecla DEL para cancelar. Después de terminar la configuración, vuelva al estado de espera automáticamente y el sistema puede identificar la semana automáticamente. Presione la tecla 2, el dígito del flash "tiempo", el tiempo de entrada presionando la tecla numérica directamente y luego presione la tecla FL / SE para confirmar. Si el dígito es incorrecto, presione la tecla DEL para cancelar. Después de la operación anterior, presione H.F para salir o regresa al estado de espera automáticamente.
Ajuste de melodías de timbre y ajuste del volúmen del timbre
- En el estado de colgado, presione la tecla FL / SET, la pantalla LCD
- Presione la tecla 2, pantalla LCD "1t 2vip 3vol"
Presione la tecla 1 para seleccionar el timbre normal, la pantalla LCD "tipo de timbre 01", presione la tecla ARRIBA o ABAJO para seleccionar las melodías de timbre deseadas. Total 16 tipos de timbres normal seleccionables.
Pulse la tecla 3 para seleccionar el volúmen del timbre, la pantalla LCD "ring vol 03", pulse la tecla ARRIBA o ABAJO para ajustar el volúmen del timbre y luego pulse H.F para salir. Total de 3 grados de volúmen de anillo seleccionable.
Ajuste del despertador
- En el estado de colgado, presione la tecla FL / SET, la pantalla LCD
-
Pulse la tecla 3, la pantalla LCD muestra "AL 1-2-3". Pulse la tecla "1" para ajustar el primer despertador, la pantalla LCD mostrará "ALAR OFF". Pulse la tecla FL / SET para confirmar. Presione la tecla ARRIBA o ABAJO para establecer el estado de encendido o apagado. De la misma manera, ajuste del grupo 2 y del grupo 3. Total 3 grupos de configuración del despertador.
-
El primer despertador significa un reloj de tiempo pero el segundo y el tercer despertador como alarma todos los días, la unidad dejará el estado de alarma presionando cualquier tecla.
> Configuración de No molestar
- En el estado de colgado, presione la tecla FL / SET, la pantalla LCD,
- Pulse la tecla 4, la pantalla LCD "off_r 00-00", luego el flash, el tiempo de entrada pulsando la tecla numérica directamente y luego presione la tecla FL / SET para confirmar. Después de la configuración, la pantalla LCD mostrará el tiempo de no molestar y contar hasta el tiempo hasta. El tiempo de No molestar se terminará cuando el tiempo se apague o tome el auricular o presione H.F y luego salga. Cuando la llamada entrante, ningún timbre sonará durante el tiempo de no molestar.
Configurar el flash, el modo de marcación y el interruptor anti robo activado / desactivado
- En el estado de colgado, presione la tecla FL / SET, la pantalla LCD,
- Presione la tecla 5, la pantalla LCD "1-f 2-pt 3-d",
- Presione la tecla 1, la pantalla LCD, luego presione ARRIBA ABAJO para seleccionar el tiempo de flash como 90ms, 95ms, 100ms, 120ms, 180ms, 300ms, 600ms or 1000ms
- Presione la tecla 2, la pantalla LCD "tono pt", luego presione ARRIBA o ABAJO para seleccionar el modo de marcación, significa el modo de marcación por tonos y significa el modo de marcación por pulsos.
- Presione la tecla 3, la pantalla LCD "defender off", a continuación, presione ARRIBA o ABAJO para seleccionar el interruptor antiladrón de encendido / apagado, "defend off" significa apagar y "defender on" significa encender.
> Configurar código de área y código PABX Configuración del código de área
- En el estado de colgado, presione la tecla FL / SET, la pantalla LCD, presione la tecla 6, las pantallas LCD "1-LOC 2-OL"
- Pulse la tecla 1, la pantalla LCD "loc ----" pulse la tecla numérica directamente y luego pulse la tecla FL / SET para confirmar. Se puede establecer un código de área total de 8 dígitos. Presione un nuevo dígito de grupo para cancelar el código de área anterior.
> Configuración del código PABX
Presione la tecla 2, la pantalla LCD "apagado". Pulse la tecla numérica directamente y luego pulse la tecla FL / SET para confirmar. Presione la tecla ARRIBA o ABAJO para cancelar el ajuste del código PABX. Se puede establecer un código PABX total de 8 dígitos. Presione un nuevo dígito de grupo para cancelar el código PABX anterior.
> Ajuste del contraste brillante
Presione la tecla FL / SET, la pantalla LCD, presione la tecla 7, la pantalla LCD "LCD con 4", presione la tecla ARRIBA o ABAJO para ajustar el contraste brillante, por defecto el grado 4, el total de 5 grados seleccionables.
> Ajuste de la función IP
- Presione la tecla FL / SET, la pantalla LCD, presione la tecla 8, la pantalla LCD La pantalla LCD "1-au 2-IP", 1 para IP automático y 2 para IP manual.
- Presione la tecla 1, la pantalla LCD "au IP off", presione la tecla ARRIBA o ABAJO para seleccionar IP automático, 17909, 17908, 193, 17911, 17921, 17931, 17951, 17991, 068, 96300, 96333, 196, 190, 17969, 197, fuera seleccionable.
- Presione la tecla 2, no aparece en la pantalla LCD, introduzca el dígito directamente y luego presione la tecla FL / SET para confirmar, IP1 está bien una vez LCD mostrar "código ip1".
HACER UNA LLAMADA
Desde el teléfono
- Levante el auricular.
- Cuando escuche el tono de marcación, marque el número deseado.
- La unidad comenzará a programar la conversación después de 6 segundos.
- Cuando haya terminado, regrese el auricular a la base.
Desde el teléfono con altavoz
- Presione la tecla H.F
- Cuando escuche el tono de marcación, marque el número deseado.
- La unidad comenzará a programar la conversación después de 6 segundos.
- Cuando termine, presione la tecla H.F otra vez.
RECIBIENDO LLAMADA
Desde el teléfono
- Levante el auricular y hable con la otra persona.
- Cuando termine, vuelva a colocar el auricular en la base.
Conmutación al altavoz
- Cuando use el auricular, presione la tecla H.F y regrese el auricular a la base
- Cuando termine, presione la tecla H.F otra vez.
Desde el altavoz
Cuando suene el teléfono, presione la tecla H.F y hable con la persona que llama. Este teléfono es un altavoz de alta calidad.
- Cuando haya terminado, pulse de nuevo la tecla
H. VISUALIZACIÓN DE NÚMEROS DE LLAMADAS PERDIDOS, RECIBIDOS Y SALIDOS
Revisar el número de llamada perdida
- En el estado de colgado o descolgado, presione la tecla ABAJO para revisar el número de llamada perdida en repetición.
- Si no hay llamada perdida, el LCD muestra
Revisión del número de llamada recibido
- En el estado de colgado o descolgado, pulse la tecla ARRIBA para revisar el número de llamada recibida en repetición.
- Si no hay llamada recibida, el LCD muestra
> Revisar el número de llamada saliente
-
En el estado de colgado o descolgado, presione la tecla OUT para revisar el número de llamada saliente, presione la tecla ARRIBA o ABAJO para verificar.
-
Si no hay ninguna llamada saliente o después de revisar todas las llamadas salientes, se muestra LCD.
LLAMANDO ATRÁS LOS NÚMEROS PERDIDOS, RECIBIDOS Y SALIDOS
Llamar los números de llamadas perdidas, recibidas o salientes en el estado de colgado.
- En el estado de colgado, revisar los números de llamada perdidos o recibidos para encontrar el número deseado.
- Presione la tecla BACK, se marca automáticamente o presione la tecla BACK dos veces, se marca con el código de larga distancia.
- Si ha configurado el código PABX por adelantado y el número es de 7 dígitos o más, presione la tecla BACK, se marcará hacia adelante con el código PABX o presione la tecla BACK dos veces, se marcará con el código PABX, el tiempo de pausa y Código de larga distancia.
Nota: El código de larga distancia es el predeterminado como "0" si no se configura por adelantado.
Llamar los números de llamadas perdidas, recibidas o salientes en el estado de descolgado.
-
En el estado de descolgado, revisar la llamada perdida o recibida para encontrar el número deseado.
-
Presione la tecla BACK, la unidad agregará un tiempo de flash y luego marcará el número automáticamente o
- Si se establece el código PABX por adelantado y el número es de 7 dígitos o más, presione la tecla BACK, se marca con el código PABX y el tiempo de pausa.
ELIMINAR LA FUNCIÓN CLAVE
Mientras revisa los números perdidos, recibidos o salientes y encuentra el número deseado, presione la tecla DEL una vez para borrarlo. Mantenga presionada la tecla DEL 3 segundos, todos los números que están revisando se borran.
REDIAL Y FUNCIÓN DE PAUSA
- Levante el auricular o presione la tecla H.F,
- Pulse la tecla RD / P, se marcará de nuevo el último número marcado.
- Presione la tecla RD / P para dar una pausa de intervalo
FUNCIÓN FLASH
Al marcar el número o durante la conversación, pulse la tecla FL / SET para cortar la marcación.
AJUSTE DEL VOLÚMEN DE MANOS LIBRES
En estado de manos libres, presione la tecla VOL + / VOL-para ajustar el volúmen de manos libres, 4 niveles ajustables.
AJUSTE DEL VOLÚMEN DEL MANDO
En el estado del auricular, presione VOL + / VOL-para ajustar el volúmen del auricular, 4 niveles ajustables.
AJUSTE DEL VOLÚMEN DEL RINGER
En el estado de gancho, presione la tecla VOL + / VOL-para ajustar el volúmen del timbre, 3 niveles ajustables.
FUNCIÓN MUTE
Cuando hable por el auricular, presione la tecla MUTE para entrar en el modo de silencio. En el modo de silencio, presione la tecla MUTE nuevamente para continuar hablando por el auricular.
MEMORIA DE LLAMADA DE UN SOLO TOQUE
Almacene el número en la memoria de un toque
En el estado de colgado, ingrese el número de teléfono deseado con la tecla numérica, mantenga presionada la tecla Mx (x = 1-4) durante 3 segundos hasta que la pantalla LCD muestre "SAVE".
Ejemplo 1. Tienda 12345678 a M1
Introduzca 12345678, luego presione y mantenga presionada la tecla M1 durante 3 segundos, la pantalla LCD "SAVE"
Ejemplo 2. Almacenar la llamada entrante 87654321 a M2
- Revisar el número de llamada entrante y encontrar el número deseado: 87654321.
- Mantenga presionada la tecla M2 2 segundos, la pantalla LCD muestra "SAVE",
Realizar una llamada desde la memoria de un solo toque
En estado de gancho o descolgado:
Presione la tecla Mx (x = 1-4), la pantalla LCD mostrará el número correspondiente y marcará automáticamente.
> Almacenar el número en la memoria de dos toques
- Introduzca el número de teléfono deseado con la tecla numérica, mantenga presionada la tecla MEMO durante 3 segundos, la pantalla LCD mostrará "SAVE", "-" parpadeará,
- Presione la tecla Nn (Nn = 0-9 numérica)
- De vuelta al estado de descolgado automáticamente después de 2 segundos, significa que el número se ha almacenado correctamente.
Ejemplo 1.
- Almacene 12345678 al número 1
-
Introduzca 12345678, luego presione la tecla MEMO, la pantalla LCD mostrará "SAVE" "-" Flash.
-
Presione la tecla numérica 1
Ejemplo.2. Almacenar la llamada entrante 87654321 al número 2
- Revisar el número de llamada entrante y encontrar el número deseado: 87654321,
- Presione y mantenga presionada la tecla MEMO 3 segundos, la pantalla LCD mostrará "SAVE""-" Flash.
- De vuelta al estado de descolgado automáticamente después de 2 segundos, significa que el número se ha almacenado correctamente.
> Hacer una llamada desde la memoria de doble toque
Presione la tecla MEMO, la pantalla LCD "LOAD" "-" parpadea y luego presione el NO (NO = 0 \~ 9), el número se marca automáticamente.
FUNCIÓN DE BLOQUEO DE TECLAS
- Número de bloqueo con "0": en el estado de gancho, presione el botón numérico "0" y dure aproximadamente 50 segundos hasta que la pantalla LCD "GUARDE".
- Número de bloqueo llevado por "9": en el estado de gancho, presione el botón numérico "9" y dure aproximadamente 50 segundos hasta que la pantalla LCD "GUARDE".
- Bloqueo de todos los números: en estado colgado, presione el botón numérico "2" y dure aproximadamente 50 segundos hasta que la pantalla LCD "GUARDE".
Nota: Para cancelar la configuración anterior, siga el mismo procedimiento.
SOLUCIÓN DE PROBLEMAS
? Sin voz
Compruebe si el teléfono está conectado o si la línea está rota.
? Recibe solo llamadas
Compruebe si el modo P / T está ajustado correctamente.
, ? ruido
Compruebe si el circuito de salida está roto. (Cambiar el circuito de salida) Compruebe si el conector está húmedo u oxidado (Cambie el conector)
? Toca una vez y luego desconecta cuando recibe una llamada. La función de marcación está disponible
Compruebe si el conector está en un ambiente húmedo.
Compruebe si se utilizan demasiadas extensiones juntas o si la calidad de la extensión no es suficiente (Cambie la extensión incorrecta)
? Sin timbre
Compruebe si la unidad está en estado DND, restablecerla a normal.
Teléfono Alámbrico
Marca: SELECT SOUND
Modelo: 8028
Especificaciones Eléctricas: 48Vcc
INTRODUCCIÓN
Thank you for your purchasing our Caller ID Telephone. This manual is designed to familiarize you with this phone. To get the maximum use from your new phone, we suggest that you read this Instruction Manual carefully before operating it.
SAFETY INSTRUCTION
When using your telephone equipment, the following basic safety precautions should always be followed to reduce the risk of fire, electric shock and injury to persons:
- Read and understand all instructions
- Follow all warnings and instructions.
3 Unplug the product from the wall outlet before cleaning. Do not use liquid cleaners or aerosol cleaners. Use damp cloth for cleaning. - Do not place this product on an unstable cart, stand or table. The product may fall, causing serious damage to the product.
- Do not overload wall outlets and extension cords as this can result in the risk of fire or electric shock.
- Never push objects of any kind into this product through cabinet slots as they may touch dangerous voltage points or short out parts that could result in a risk of fire or electric shock. Never spill liquid of any kind on the product.
- Avoid using this unit during an electrical storm, move or disconnect the unit, there may be a remote risk of electronic shock from lightning and thunder.
- Unauthorized persons cannot open or service even if there is a defect with the unit. This will void the warranty, please send to authorized service center for repair.
FEATURES
• FSK/DTMF Compatible
• Handset and Handsfree speaker
• Real clock, date & week display
- LCD blue backlight
• 50 incoming and 14 outgoing call memories
• 16 kinds of normal ring selectable
• 3 groups of alarm function
- Flash time adjustable
• Do Not Disturb function
• P/T dialing mode adjustable
- Anti-thief function
• Area code and PABX code setting
• 5 levels of LCD brightness adjustable
• One group Auto IP and one group of manual IP setting
• Redial, pause and flash function
• Pre-dial, edit and back dialing function
- Hold on music
• 3 groups of one-touch call memories
• 10 groups of two-touch call memories
• 3 grades of handsfree volume adjustable
• 3 grades of handset volume adjustable
• 4 grades of ringer volume adjustable
• Incoming call ringer LED indicator
• Key lock function
GETTING STARTED
Plug coiled cord into handset modular jack and plug the other end into the jack on left side of the telephone. Plug line cord into jack at the rear of telephone base, the other end of the line cord is for connecting telephone line wall jack.

① M2
5 HOLD
9 M1
13 VOL-
② M3
6 DOWN
10 MEMO
⑭ OUT
③ DEL
7) RD/P
11 UP
15 NUMERICAL KEY
4 BACK
8 H.F
12 VOL +
16 FL/SET
FUNCTION AND OPERATION DESCRIPTION
MENU SETTING
In on-hook state, press SET/FL key to enter setting state, LCD displays, the number of 12345678 is setting opinion, press the desire number and press DEL key to edit the wrong digit. Press SET/FL key to confirm and press DEL key to go to superior menu.
> Setting date & time
- In on-hook state.
- Press SET/FL key, LCD displays
- Press 1 key, LCD display 1-DATE, 2-CL.
Press 1 key, digit of "date" flashes, input date by pressing digit key directly then press SET/FL key to confirm. If digit is wrong, press DEL key to cancel. After finish setting, it returns to standby state automatically and system can identify the week automatically.
Press 2 key, digit of "time" flash, input time by pressing digit key directly then press SET/FL key to confirm. If digit is wrong, press DEL key to cancel.
After the above operation, press H.F to quit or it returns to standby state automatically
> Setting ringing melodies and adjust ring volume
- In on-hook state, press SET/FL key, LCD displays
- Press 2 key, LCD display "1t 2vip 3vol"
Press 1 key to select normal ring, LCD display "ring type 01", press UP or DOWN key to select desired ringing melodies. Total 16 kinds of normal ring selectable.
Press 2 key to select VIP ring, LCD display “ring vip 01”, the same way as setting normal ring. Total 16 kinds of VIP ring selectable.(Note this model does not have this function)
Press 3 key to select ring volume, LCD display “ring vol 03”, Press UP or DOWN key to adjust the ring volume and then press H.F to quit. Total 3 grades of ring volume selectable.
> Setting alarm clock
- In on-hook state, press SET/FL key, LCD displays
-
Press 3 key, LCD displays "AL 1-2-3". Press 1 key to set the first alarm clock, LCD displays "ALAR OFF". input time by pressing digit key directly, then press SET/FL key to confirm. Press UP or DOWN key to set it ON state or OFF state. The same way setting from group 2 and group 3. Total 3 groups of alarm clock setting.
-
The First alarm clock means one time clock but the second and the third alarm clock as alarm every day, the unit will quit the alarm state by pressing any key.
> Setting Do Not Disturb
- In on-hook state, press SET/FL key, LCD displays,
- Press 4 key, LCD display "off_r0000", then digit flash, input time by pressing digit key directly and then press SET/FL key to confirm. After setting, LCD will display the do not disturb time and count down till time up. Do Not Disturb time will be end when the time up or take handset or press H.F then quit. When incoming call, no ring during the do not disturb time.
> Setting flash, dialing mode and anti-thief switch on/off
- In on-hook state, press SET/FL key, LCD displays,
- Press 5 key, LCD display "1-f 2-pt 3-d",
- Press 1 key, LCD display, then press UP or DOWN to select flash time at 90ms, 95ms, 100ms, 120ms, 180ms, 300ms, 600ms or 1000ms, default is 600ms.
- Press 2 key, LCD display "pt tone", then press UP or DOWN to select dialing mode, means the tone dialing mode and means the pulse dialing mode.
Note: 1) P/T also can be switched by the following way: In on-hook state, press number button "1" and last around 22 seconds till LCD display "SAVE" to switch the Pulse and Tone mode, default setting is Tone mode);
2) While in the pulse mode, press '*' button before or during dialing then the dialing mode will be changed from Pulse to Tone mode. If you press and release the Hook-Switch, the dialing model will return to Pulse mode.
- Press 3 key, LCD display "defend off", then press UP or DOWN to select anti-thief switch on/off, "defend off" means switch off and "defend on" means switch on.
> Setting area code and PABX code
Setting area code
- In on-hook state, press SET/FL key, LCD displays , press 6 key, LCD displays "1-LOC 2-OL"
- Press 1 key, LCD display "loc ----" press digit key directly and then press SET/FL key to confirm. Total 8 digit area code can be set. Press one new group digit to cancel the former setting area code.
Setting PABX code
Press 2 key, LCD display "out off". press digit key directly and then press SET/FL key to confirm. Press UP or DOWN key can cancel PABX code setting. Total 8 digits PABX code can be set. Press one new group digit to cancel the former setting PABX code.
> Setting bright contrast
At on-hook state, press SET/FL key, LCD displays ,press 7 key, LCD display "LCD con 4", press UP or DOWN key to adjust the bright contrast, default the 3 grade, total 5 grades selectable.
> Setting IP function
- At on-hook state, press SET/FL key, LCD displays ,press 8 key, LCD display LCD display "1-au 2-IP", 1 is for auto IP and 2 is for manual IP .
- Press 1 key, LCD display "au IP off", press UP or DOWN key to select auto IP, 17909, 17908, 193, 17911, 17921, 17931, 17951, 17991, 068, 96300, 96333, 196, 190, 17969, 197, off selectable.
- Press 2 key, no display in LCD, input digit directly and then press SET/FL key to confirm, IP1 is okay once LCD display "ip1 code".
MAKING A CALL
> From handset
- Pick up the handset.
- When you hear the dial tone, dial the desired number.
- The unit will start to time the conversation after 6 seconds.
- When finished, return the handset to the base.
> From Speakerphone
- Press H.F key
- When you hear the dial tone, dial the desired number.
- The unit will start to time the conversation after 6 seconds.
- When finished, press H.F key again.
RECEIVING A CALL
> From handset
- Pick up the handset and talk to the other party.
- When finished, return the handset to the base.
> Switching to speakerphone
- When using the handset, press H.F key and return the handset to the base
- When finished, press H.F key again.
> From speakerphone
When the telephone rings, press H.F key and talk to the caller. When finished press H.F key again.
REVIEWING MISSED, RECEIVED AND OUTGOING CALL NUMBERS
> Reviewing missed call number
- In on-hook or off-hook state, press DOWN key to review missed call number in repetition.
- If there is no missed call, LCD displays
> Reviewing received call number
- In on-hook or off-hook state, press UP key to review received call number in repetition.
- If there is no missed call, LCD displays
> Reviewing outgoing call number
- In on-hook or off-hook state, press OUT key to review outgoing call number, press UP or DOWN key to check.
- If no outgoing call or after reviewed all outgoing calls, LCD displays.
CALLING BACK MISSED, RECEIVED, AND OUTGOING NUMBERS
> Calling back missed, received or outgoing call numbers in on-hook state.
- In on-hook state, reviewing missed, received or outgoing call numbers to find a desired number.
- Press BACK key, it is dialed out automatically or press BACK key twice, it is dialed out ahead with long distance code.
- If set PABX code in advance, and the number is 7-digit or more, press BACK key, it is dialed out ahead with the PABX code, or press BACK key twice, it is dialed out with PABX code, pause time and long distance code.
Note: Long distance code is default as "0" if not set in advance.
> Calling back missed, received or outgoing call numbers in off-hook state.
- In off-hook state, reviewing missed or received call to find a desired number
- Press BACK key, unit will add a flash time and then dial the number automatically or
- If set PABX code in advance, and the number is 7-digit or more, press BACK key, it is dialed out ahead with PABX code and pause time.
DELETE KEY FUNCTION
While reviewing missed, received or outgoing numbers and find a desired number, press DEL key one time to delete it. Press and hold DEL key 3 seconds, all the numbers been reviewing are deleted.
REDIAL AND PAUSE FUNCTION
- Pick up handset or press H.F key,
- Press RD/P key, the last dialed number is dialed again.
- Once dialing a number, press RD/P key to give an interval pause
FLASH FUNCTION
When dialing number or during the conversation, press the SET/FL key to cut the dialing. Default flash time is 600MS.
ADJUSTING HANDSFREE VOLUME
In handsfree state, press VOL+/VOL-key to adjust handsfree volume, 3 levels adjustable.
(Handsfree volume 1,2,3 grade), default is handsfree volume 3 grade.
ADJUSTING HANDSET VOLUME
In handset state, press VOL+/VOL-key to adjust handset volume, 3 levels adjustable (Handset volume 1,2,3 grade), default is handset volume 1 grade.
ADJUSTING RINGER VOLUME
In on-hook state, press VOL+/VOL-key to adjust ringer volume, 3 levels adjustable (ringer volume 1, ringer volume 2, ringer volume 3, ringer volume OFF), default is ringer volume 3.
HOLD ON MUSIC
> Hold on music function
When talking over handset, press HOLD key to enter the hold mode and the hold music is sent out. In hold mode
- Press HOLD key to release hold mode and continue to talk over handset, or
- Hang up handset, it enters handsfree hold mode.
When talking at handsfree mode, press HOLD key to enter the hold mode and the hold music is sent out. In hold mode - Pick up handset to talk over handset, or
- Press HOLD or H.F key to quit hold mode and talk at handsfree mode.
ONE-TOUCH CALL MEMORY
> Store the number in one-touch memory
At on-hook state, Input the desired telephone number using digit key, press and hold Mx(x=1-3) key for 3 seconds till LCD displays "SAVE".
Eg.1. Store 12345678 to M1
Input 12345678, then press and hold M1 key for 3 seconds, LCD display "SAVE"
Eq.2. Store incoming call 87654321 to M2
-
Reviewing the incoming call number and find a desired number: 87654321
-
Press and hold M2 key 2 seconds, LCD displays "SAVE"
> Make a call from one-touch memory
At on-hook state or off-hook state:
Press Mx(x=1-3) key, LCD displays relevant number and dial out automatically TWO-TOUCH MEMORY
> Store the number in two-touch memory
- Input the desired telephone number using digit key, press and hold MEMO key for 3 seconds, LCD displays "SAVE", "-" flash,
- Press Nn(Nn=0-9 numerical) key
- Back to off-hook state automatically after 2 seconds, means the number is stored successfully.
Eg.1. Store 12345678 to digit number 1
- Input 12345678, then press MEMO key, LCD displays "SAVE"-"Flash.
- Press Numerical 1 key
Eg.2. Store incoming call 87654321 to digit number 2
- Reviewing the incoming call number and find a desired number: 87654321,
- Press and hold MEMO key 3 seconds, LCD displays "SAVE"-"Flash.
- Back to off-hook state automatically after 2 seconds, means the number is stored successfully.
> Make a call from two-touch memory
Press MEMO key, LCD display "LOAD" "-" flash, and then press the NO (NO.=0\~9), the number is dialed automatically.
KEY LOCK FUNCTION
- Lock number led by "0": in on-hook state, press number button "0" and last around 50 seconds till LCD display "SAVE".
- Lock number led by "9": in on-hook state, press number button "9" and last around 50 seconds till LCD display "SAVE".
- All number lock: in on-hook state, press number button "2" and last around 50 seconds till LCD display "SAVE".
Note: To cancel the above setting, follow the same way.
TROUBLE SHOOTING
> ? No voice
Check if the handset is on the phone or line is broken.
> ? Receive only
Check if P/T mode is properly set.
> ? Noise
Check if the outlet circuit is broken. (Change the outlet circuit)
Check if the connector is moist or rust (Change the connector)
> ? Ring once then disconnect when receive a call. Dialing function is available
Check if connector is in a moist environment.
Check if too many extensions are used together or the quality of extension is not good enough (Change the bad extension)
> ? No ring
Check if the unit is in DND state, res