PRE-73 DLX PREMIER - Modtager Golden Age Project - Gratis brugsanvisning og manual
Find enhedens vejledning gratis PRE-73 DLX PREMIER Golden Age Project i PDF-format.

Brugerspørgsmål om PRE-73 DLX PREMIER Golden Age Project
0 spørgsmål om dette apparat. Besvar dem du kender, eller stil dit eget.
Stil et nyt spørgsmål om dette apparat
Download vejledningen til din Modtager i PDF-format gratis! Find din vejledning PRE-73 DLX PREMIER - Golden Age Project og tag din elektroniske enhed tilbage i hånden. På denne side er alle dokumenter nødvendige for brugen af din enhed offentliggjort. PRE-73 DLX PREMIER af mærket Golden Age Project.
BRUGSANVISNING PRE-73 DLX PREMIER Golden Age Project
INTRODUCTION
Congratulations on choosing the Golden Age Project PRE-73 DLX PREMIER microphone preamplifier!
The PRE-73 DLX PREMIER is a one-channel vintage style microphone-, line- and instrument preamplifier. The signal path uses only discrete components like resistors, capacitors and transistors. The line and microphone input and the line output are transformer balanced, using three different transformers, each one optimized for its purpose.
This is the way audio components were built before integrated circuits became available. The subjective sound quality delivered by vintage equipment is often preferred over the one delivered by modem products, a situation that is even more obvious now when music is recorded with clean sounding digital audio equipment.
The circuit used in the PRE-73 DLX PREMIER is similar to the preamp section in the classical 1073 module with a corresponding sound character that is warm, punchy, sweet and musical. These classic characteristics have been heard on countless recordings through the years and it is a versatile sound that works very well on most sound sources and in most genres. The essence of this sound is now available at a surprisingly low cost, making it available to nearly everyone.
FEATURES
- Vintage style electronics. No integrated circuits in the signal path.
- All soldered, connector-free internal design for the purest and most reliable signal path, the only connector used is for the gain switch.
- UK-made Carnhill mic input and line output transformers and highpass inductor. The line input uses a custom transformer and the circuit board is prepared for the Carnhill tone. The output is balanced and fully floating and can drive a 600 ohm load up to about 28 dBu.
- Traditional 23-position 1073-style gain switch that is also used to select the mic or the line input jack.
- Combo XLR/TRS mic and line input jacks and separate output XLR and TRS jacks for flexible connections.
- A Neutrik XLR/TRS combo jack with gold over nickel plated bronze contacts is used for the mic input.
- Maximum gain on the mic input is 80 dB, enough to handle passive ribbon mics with quiet sound sources.
- Switchable impedance on the mic input, 1200 or 300 ohms. Changing the load impedance will change the tone of many mics.
- Gain range on the line input: -20 to +10 dB.
- An active instrument input for guitar and bass that passes the signal through the mic input transformer, with selectable input impedance, hi-Z or 100 kohm, by an internal jumper.
- Switchable phantom power and absolute phase. Traditional gain switch plastic knob and metal knobs for the other controls.
- The phantom power can deliver up to 10 mA according to the specification standard. The 6.8 kohm phantom power resistors are matched to within 0.1% to maintain good common-mode rejection in the circuit.
- Selectable 1073-style inductor based highpass filter at 50, 80, 160 or 300 Hz with a slope of 18 dB / octave.
- Selectable two position AIR EQ with a boost of about 3 or 6 dB at around 30 kHz.
- Insert jack for inserting EQ's and other units. The insert jack can be switched in/out from the front panel. An internal jumper can select if the insert jack always has an output signal or not.
- The output level control makes it possible to make fine gain adjustments and also to overload the main gain stage(s) for more character and then lower the signal to a suitable level before the output stage.
- An output pad allows the user to add character by attenuating the output signal after the output transformer by -7, -14, -21 or -28 dB for overdriving the output stage and the output transformer by adding gain and then lower the output signal to a suitable level with the pad.
- A simple but effective 4-step LED output level meter.
- Tantalum and polystyrene capacitors in the traditional positions. Neutrik XLR/TRS combo jack is used for the mic input.
- Switches on the back panel for 600 ohm output termination and ground lift.
- Relays are used to control internal switching for phantom power, mic low-Z, insert and DI for shorter circuit board signal paths. The relays are controlled by front panel switches.
- Circuit board star grounding scheme.
- Power supply with separate regulators for the audio circuit and the relay and LED circuit.
- External power supply to avoid interaction with the audio circuits and transformers.
- A solid build quality that will last many years of normal use.

CIRCUIT DESCRIPTION
The signal first enters an input transformer. one for the mic input and a one for the line input. The primary of the mic input transformer has two windings that are either connected in series or in parallel which results in an input impedance of either 1200 Ohms or 300 Ohms for the microphone input.
The transformers are followed by two input gain stages. For gains up to 50dB, only one of them is being used. For gains above 50dB,
the second gain stage is inserted in the signal path. Both gain stages uses only three transistors each.
The signal then goes to the insert relay. the highpass filter and the output level potentiometer and from there on to the output stage. This stage again only uses three transistors, the last one in the chain is a hefty 2N3055 power transistor run in class-A mode, driving the output transformer that is followed by the stepped output attenuator.
So, all in all, the complete signal chain only contains a maximum of nine active elements. Compare that to the big number of transistors that are usually used in one single integrated circuit!
USING THE PRE-73 DLX PREMIER
Using a preamplifier is not rocket science. Here are some points though to help you getting the maximum out of the PRE-73 DLX PREMIER:
- Connect the cable from the power adaptor to the 24V AC connector on the back panel of the PRE-73 DLX PREMIER. Do position the adaptor away from the preamp. Power on the unit with the POWER switch on the front panel.
- Connect your mic and/or line sources to the input XLR/TRS combo jacks on the back panel. A mic and a line source can be connected at the same time.
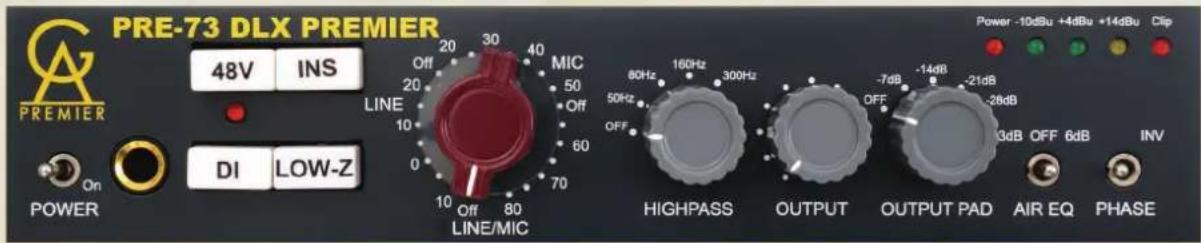
- Switching between the mic and line input is simply done by setting the LINE/MIC gain switch to one of the LINE or MIC positions.
- Connect a cable from the XLR or the TRS output jack to the next unit in the signal chain. Both jacks are connected in parallel and carry the same signal. The outputs can feed both balanced and unbalanced inputs.
- Engage +48V phantom power for any microphone that needs it. It is a good procedure to always disengage the phantom power and wait for about 10 seconds before unplugging a microphone.
- When the LOW-Z switch is engaged, the input impedance of the mic input drops from 1200 Ohms to 300 Ohms. This will change the tone of many microphones and will give you one more soundshaping option. It will also increase the signal level.
SOUND CHARACTER
If you want the smallest amount of coloration, always set the OUTPUT level potentiometer at or close to maximum. the OUTPUT PAD to OFF and adjust the output level with the stepped LINE/MIC gain switch.
If you want more character, you can do any, or both of the following:
- Turn the OUTPUT level potentiometer counterclock-wise and increase gain with the LINE/MIC switch. This will drive the input gain stage(s) harder and provoke more character from them.
- Engage the stepped output attenuator (OUTPUT PAD) and again increase gain with the LINE/MIC switch. This will also drive the output stage and the output transformer harder and add character.
Setting OUTPUT PAD at -14 dB is also useful if the input of the following unit has the -10 dBu semi-professional operating level. The standard operating level of the PRE-73 DLX is +4 dBu, the output level into a 600 ohm load will be about 1.23V when the "0" VU LED is lit when OUTPUT PAD is OFF.
DI INPUT
Instruments can be connected to the active DI TRS input on the front panel. The DI uses a FET-buffer and has an input impedance of about 1.5 Mohm. Press the DI switch to engage this input. The DI input works in the MIC positions of the LINE/MIC switch. Mic and Line sources at the back can remain connected. The output of the DI circuit is sent through the mic input transformer.
HIGHPASS FILTER
The PRE-73 DLX PREMIER has an inductor based highpass filter with a roll off of 18 dB/octave. This is a very useful tool to remove excessive bass energy.
AIR EQ
Engage one of the two positions of the AIR EQ if you want to add some level in the upper frequency range. The center of the boost is at around 30 kHz. The center OFF-position of the switch disengages the boost.
PHASE SWITCH
The phase switch simply reverses the phase by reversing the wires from the secondary winding of the output transformer. Reversing the phase of the signal is useful on a number of occasions, one example is phase reversing the lower mic of a snare drum to make it sum in phase with the upper mic.
INSERT JACK
There is an unbalanced insert jack located on the back panel where you can insert equalizers and other external effect units. It has an operating level of about -18 dBu to -10 dBu. Send is on "tip" and return on "ring". The insert is engaged by pressing the INS switch on the front panel.
600 OHM TERM SWITCH
The output transformer used in the PRE-73 DLX PREMIER is designed for having an ideal load of about 600 ohm. The input impedance of most modern units is 10 kohm or more. The PRE-73 DLX PREMIER has a 600 ohm output termination switch located on the back panel. Engaging the switch terminates the output transformer with a resistor to bring down the load to about 600 ohms when the PRE-73 DLX PREMIER is used with modern products that will typically have an input impedance of about 10 kohm.
This switch should normally be engaged if you are connecting the PRE-73 DLX PREMIER to a modern product.
PLEASE NOTE: the output pad is designed for a load of 600 ohms meaning you must have the termination switched engaged when the output of PRE-73 DLX PREMIER is connected to a modern unit with a high-impedance input.
GROUND LIFT
There is a ground lift switch on the back panel that lifts the internal ground from the cabinet. If the unit is mounted in a rack together with other units and you experience ground loop problems, try engaging it.
CUSTOMIZING THE PRE-73 DLX PREMIER
There are several functions in the PRE-73 DLX PREMIER that can be customized by the user. Remove the top panel of the box and follow the instructions below.
-
To change the input impedance of the active DI input to 100 kohm Locate the jumper "DILowZ" just behind the DI TRS jack. Relocate the jumper so that it covers both pins.
-
To cut the output signal to the insert jack when insert is not activated
Locate jumper "INSERT OUT" just behind the middle of the LINE input XLR and the INSERT TRS jack. Remove the jumper and attach it to just one of the two pins.
GAIN SETTING
There is a lot of gain available in the PRE-73 DLX PREMIER. If you ever experience self oscillation, make sure that the OUTPUT level control is set at or close to it's maximum setting and reduce gain with the LINE/MIC switch. You can also try to disengage the Air EQ if it is used.
Do not use the highest gain settings with the active DI input engaged, this is not needed anyway.
CARNHILL UPGRADE
The circuit board of the PRE-73 DLX MKII is prepared for the Carnhill line input transformer. The upgrade work can be made by the distributor in your area or you can do it yourself if you have soldering experience.
The Carnhill part can be bought in our webshop at www.goldenagemusic.se.
WARRANTY
The PRE-73 DLX PREMIER is built to last. But as in any electronic device, components can break down.
There is a 1.0A, slow blow fuse located inside the unit. If the unit dies, please check this fuse. If it has blown, replace it with a new one. You can also try with another 24V AC adaptor if you have one available.
If this doesn't help, or if the unit has another problem, it will need repair and you should then contact the reseller where you bought the unit.
The warranty period is decided by the distributor for your country. The distributor will support Golden Age Project resellers and end users with repairs and spare parts.
REGISTRATION
You are welcome to register your unit at: www.goldenagepremier.com
I would like to thank you for choosing the PRE-73 DLX PREMIER!
I hope it will serve you well and that it will help you in making
many great sounding recordings.
Bo Medin