
QCY-62401 - Overvågningskamera Qian - Gratis brugsanvisning og manual
Find enhedens vejledning gratis QCY-62401 Qian i PDF-format.

Brugerspørgsmål om QCY-62401 Qian
0 spørgsmål om dette apparat. Besvar dem du kender, eller stil dit eget.
Stil et nyt spørgsmål om dette apparat
Download vejledningen til din Overvågningskamera i PDF-format gratis! Find din vejledning QCY-62401 - Qian og tag din elektroniske enhed tilbage i hånden. På denne side er alle dokumenter nødvendige for brugen af din enhed offentliggjort. QCY-62401 af mærket Qian.
BRUGSANVISNING QCY-62401 Qian
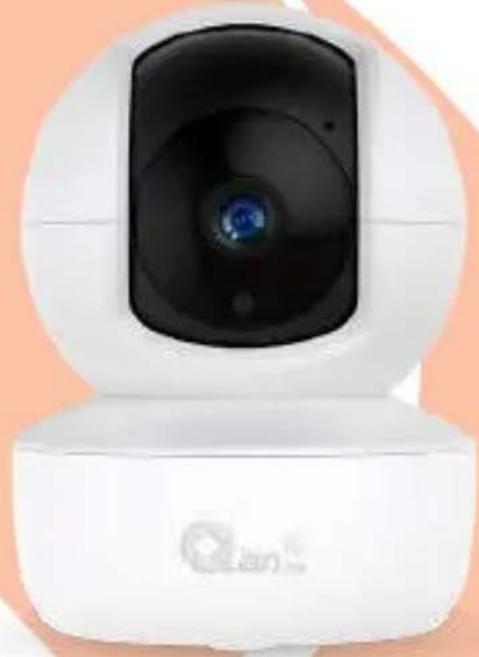
YAN Cámara Inalámbrica Mini PTZ 1080p con Audio / YAN Wireless PTZ Mini Camera 1080p with Audio
natural_image
White remote camera with lens and control panel (no visible text or symbols)MODELO/MODEL QCY-62401

Video HD de 2.0MP 2.0MP HD Video

Control Vía Aplicación Móvil Control Via Mobile APP

Control de Rotación Rotation Controllable

Comunicación Bidireccional Bidirectional Communication

Visión Nocturna Infrarroja Infrared Night Vision

Seguimiento Automático de Movimiento Auto Tracking Movements

Detección de Movimiento Motion Detection

Tarjeta Micro SD de Hasta 64GB TF Card Up to 64GB
Por favor lea cuidadosamente antes de usar su equipo y guárdelo para uso de futuras consultas. (Página 2)
Please read carefully before using your equipment and save it for future use. (Page 14)
MANUAL DE USUARIO / USER MANUAL
Cámara Wifi Con Almacenamiento en Nube Operación Manual
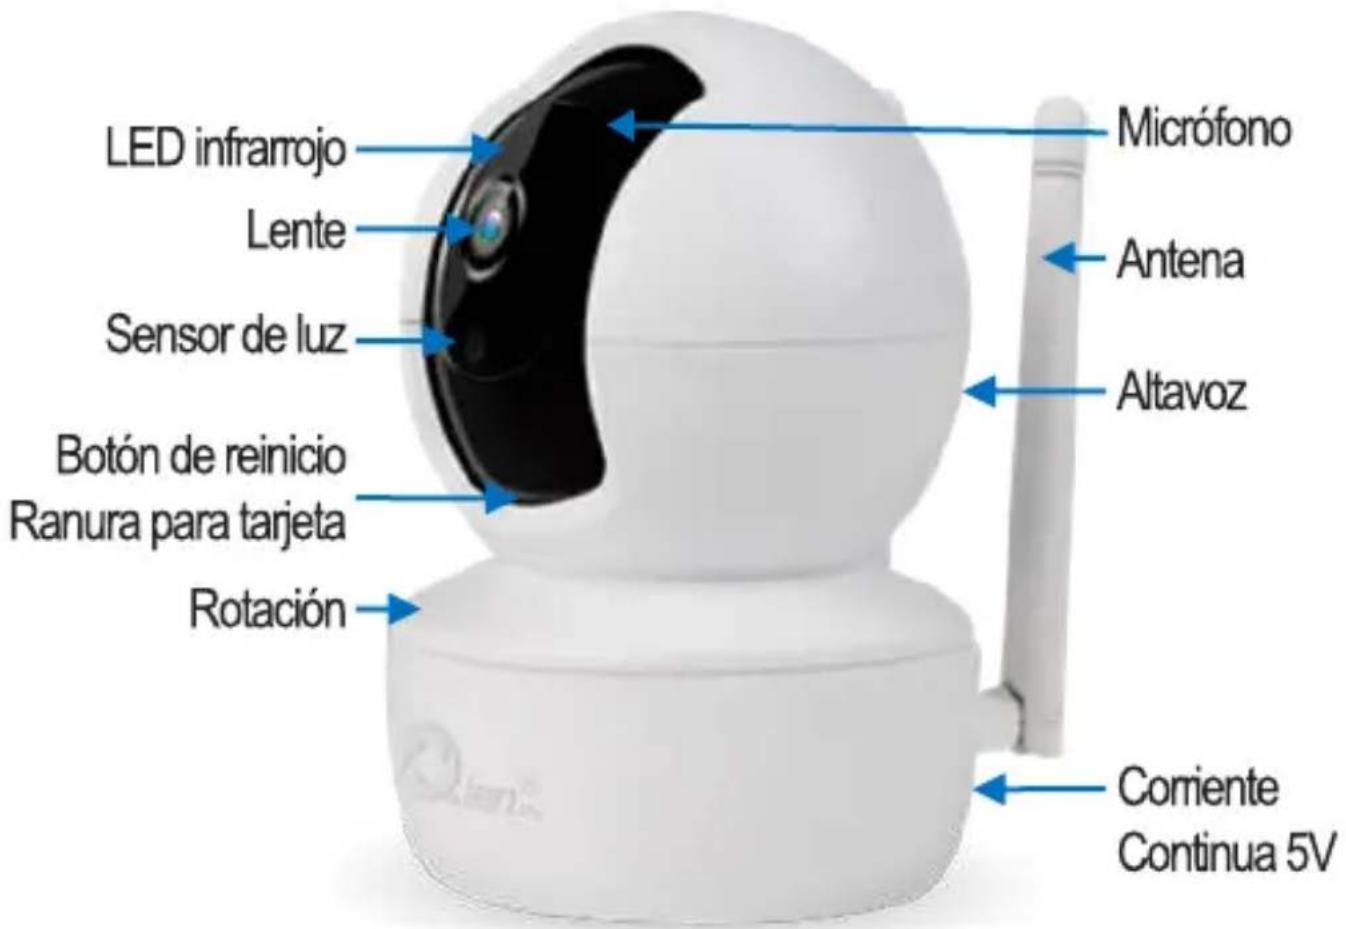
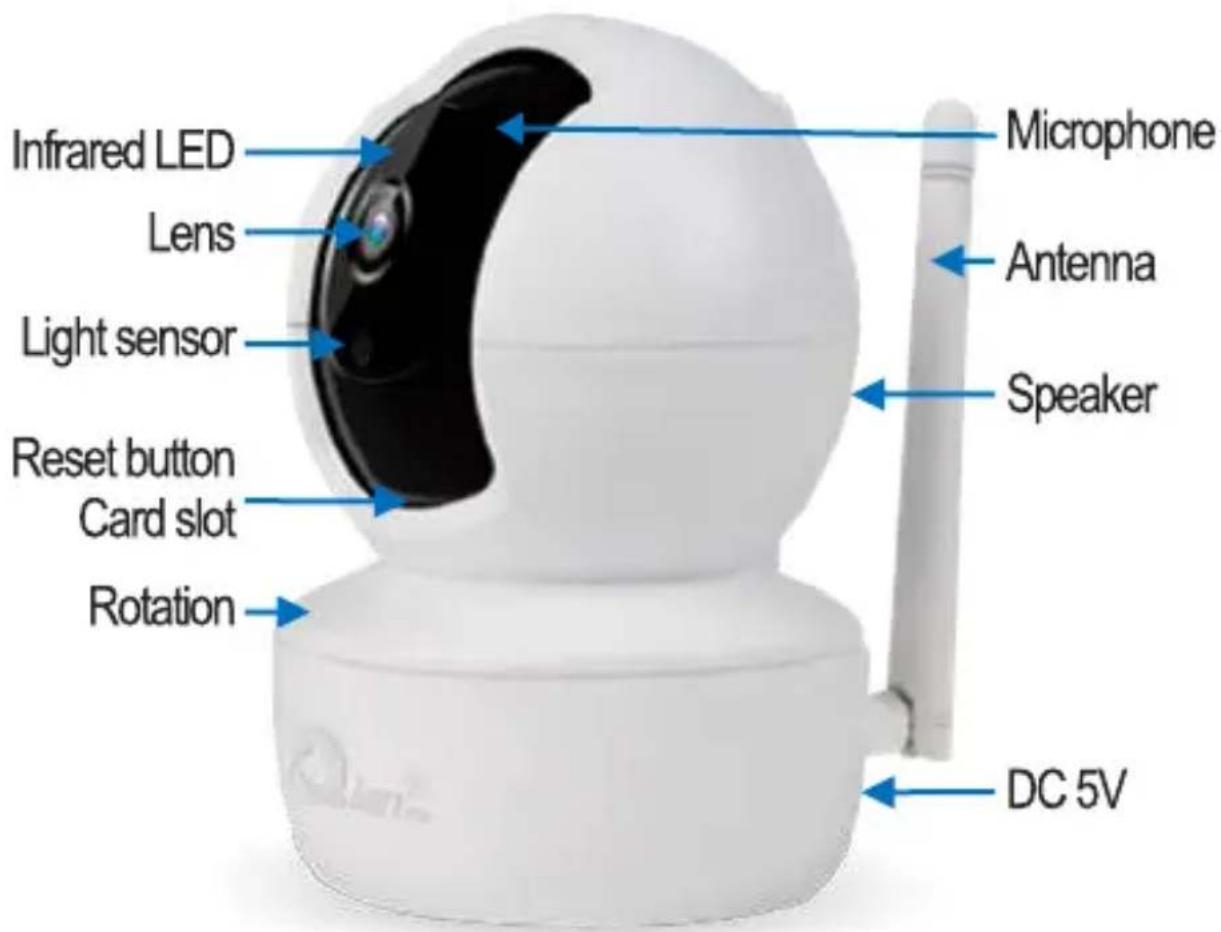
1. Descripción de la cámara
Unidad principal:
2. Descarga de la App
Busque y descargue "YCC365 Plus" en la tienda de aplicaciones Apple Sore o Android. O escanee a continuación el código QR para descargarlo e instalarlo

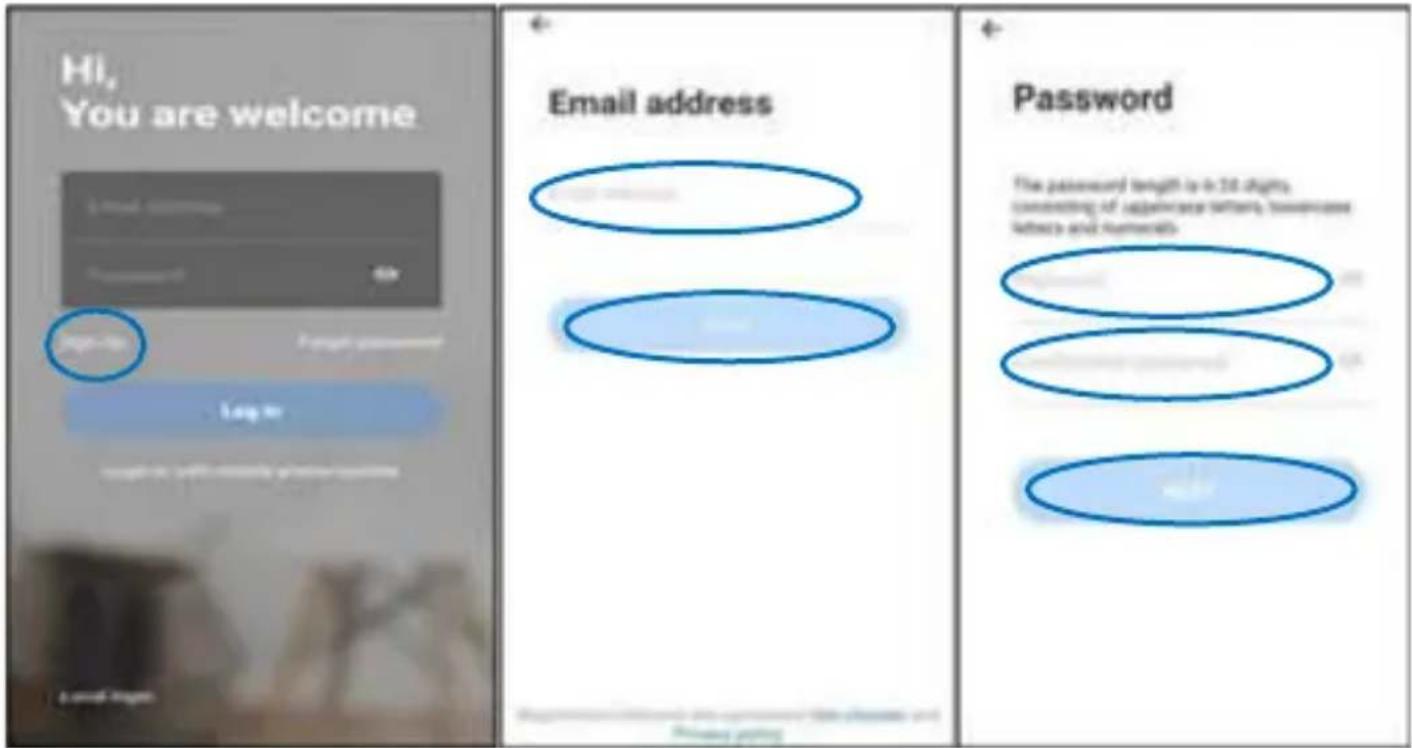
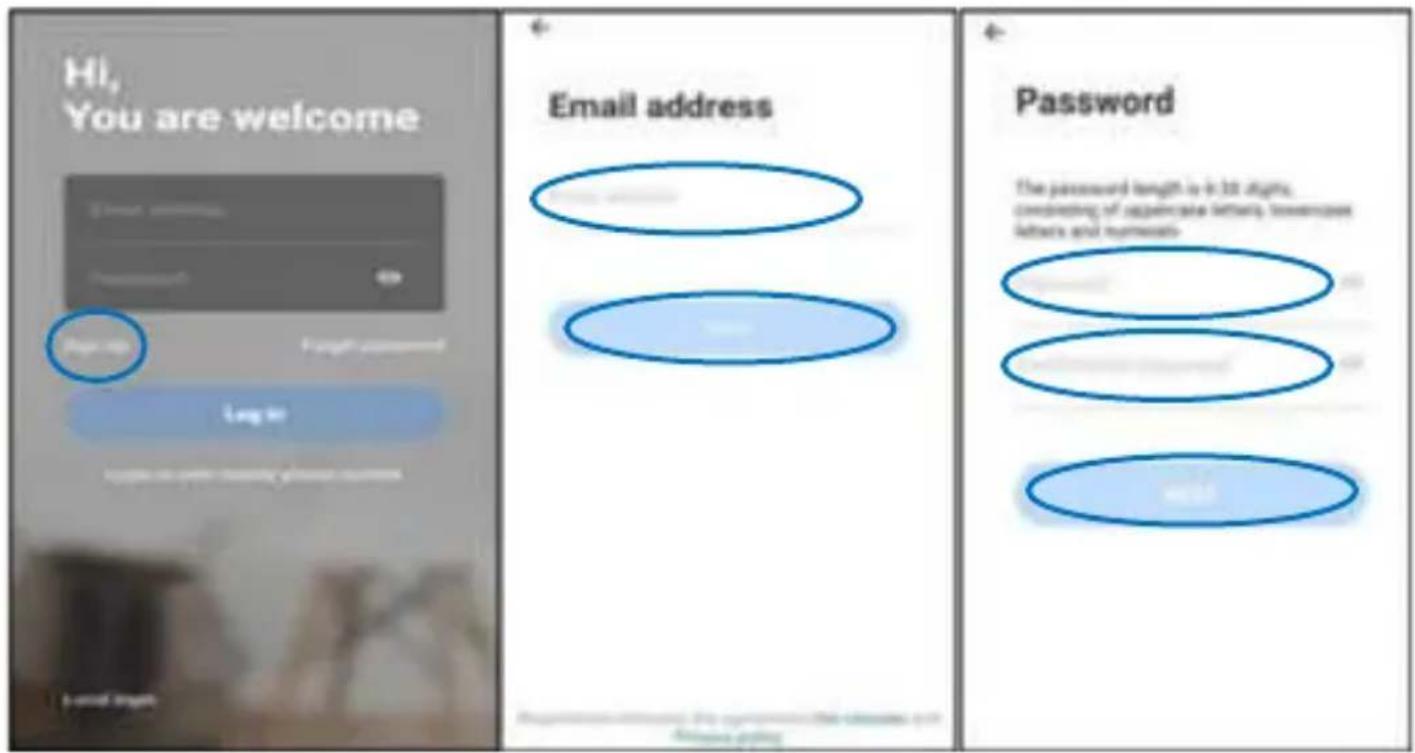
3. Registar una cuenta de usuario e iniciar sesión
Haga clic en “Registrarse” (Sign up) para registrar su correo electrónico como ID de usuario y crear una contraseña de acuerdo con el procedimiento. Después del registro, puede iniciar sesión con su cuenta registrada. Si olvida su contraseña, puede restablecerla, simplemente haga clic en “Olvidé mi contraseña” (Forgot password) en la página de inicio de sesión.
4. Añadir cámara con red
Nota: la cámara solo soporta 2.4G WIFI. Antes de agregar dispositivos, asegúrese de que su enrutador sea 2.4G WIFI y que su teléfono esté conectado al enrutador 2.4G WIFI.
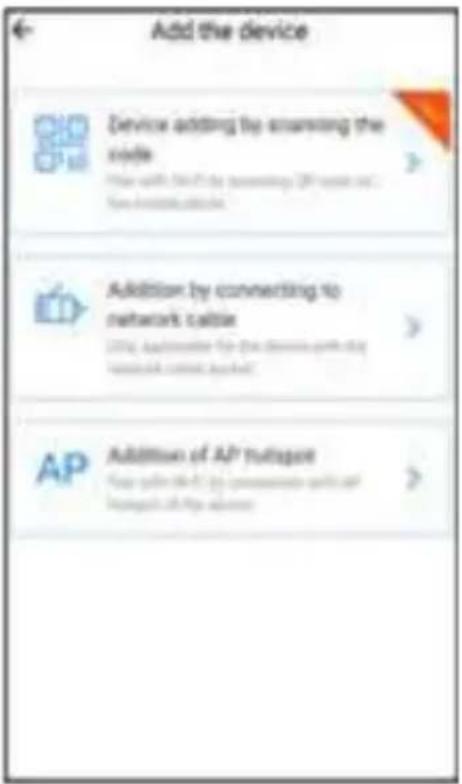
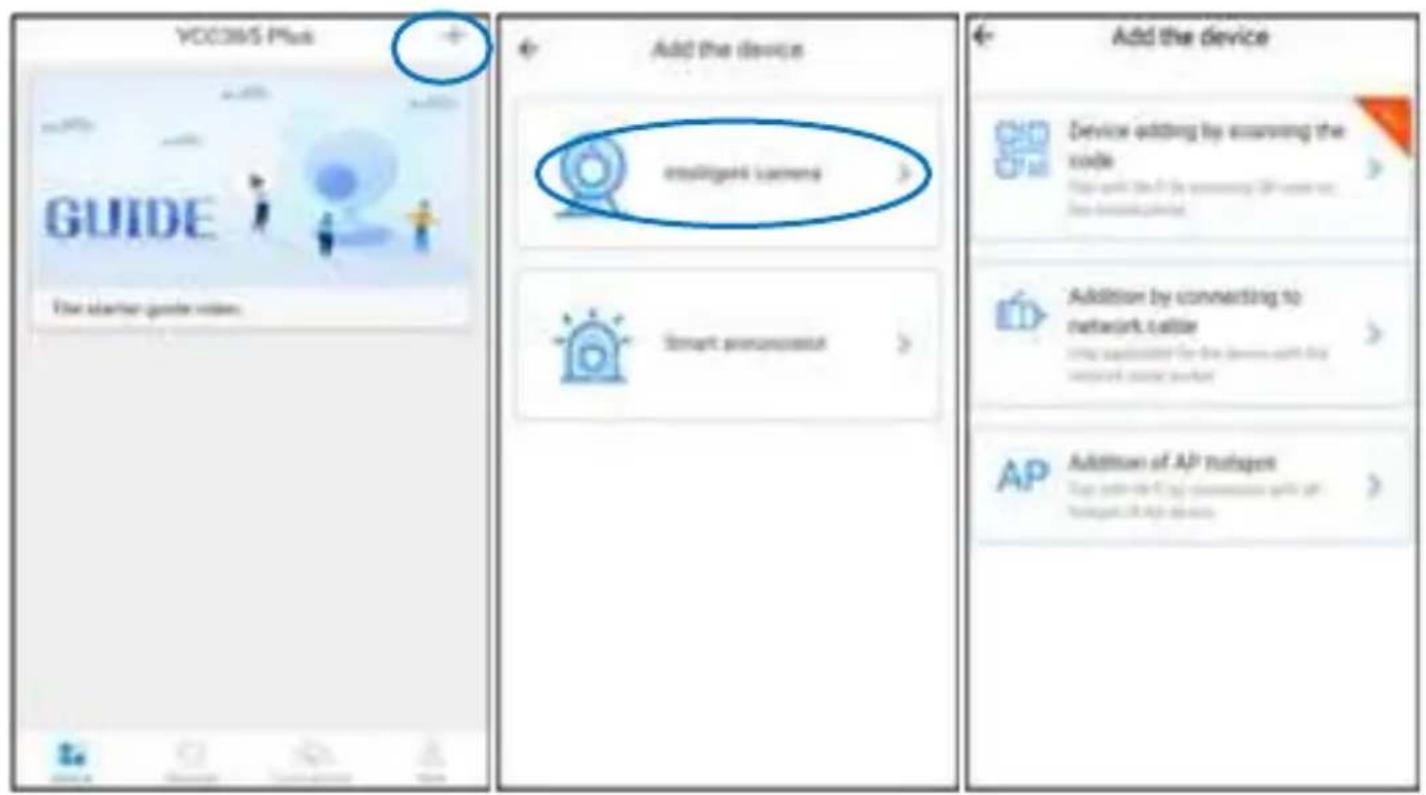
En el teléfono móvil, inicie la aplicación "YCC365 Plus". Haga clic en "+" en la esquina superior derecha para agregar el dispositivo. Luego haga clic en "Cámara inteligente" (Intelligent camera).
Hay tres formas de agregar cámaras: "Dispositivo que se agrega al escanear el código" (Device adding by scanning the
code), "Adición por conexión al cable de red" (Addition by connection to network cable) y "Adición de punto de acceso AP" (Addition of AP hotspot).


A. Dispositivo que agrega escaneando el código. (Sugerir para usar de esta manera)
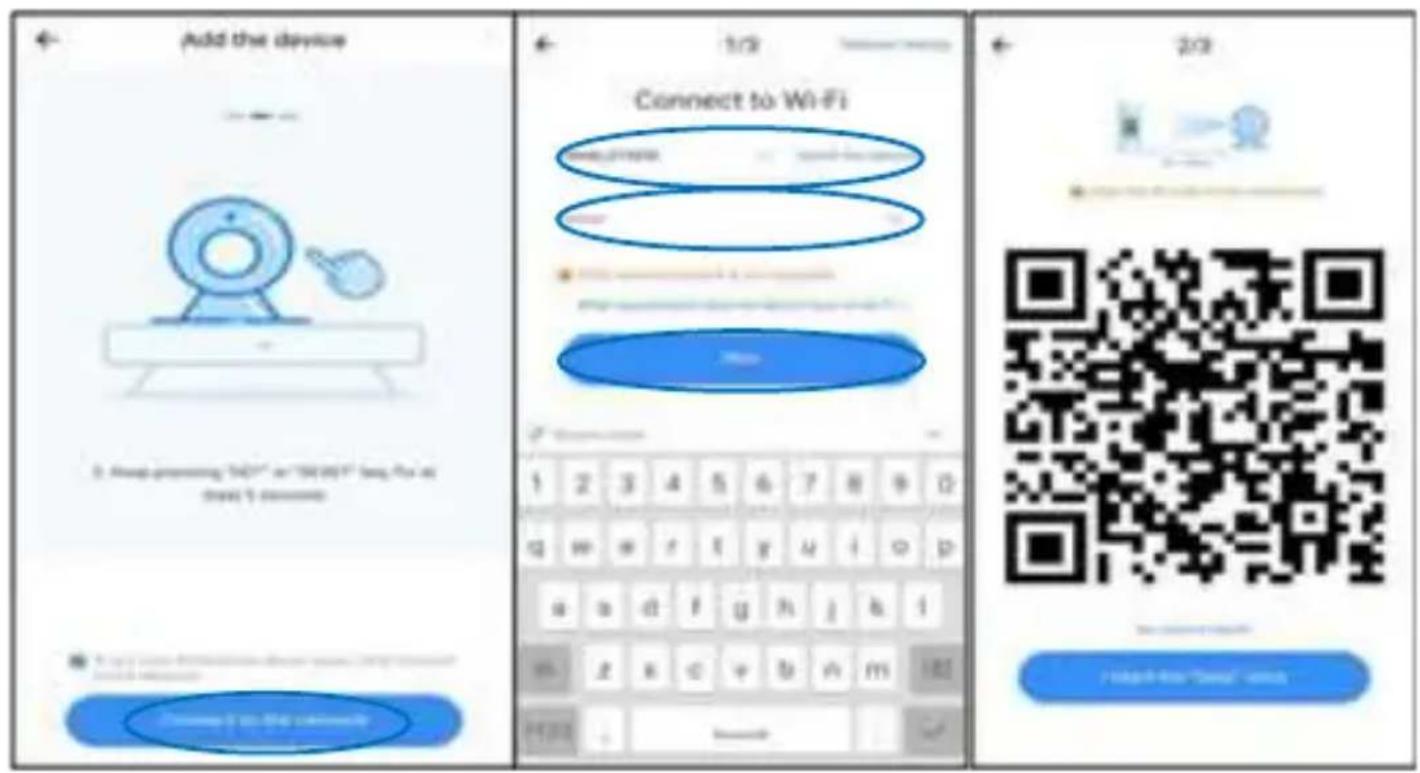
Conecte el adaptador de corriente a la cámara. Espere unos segundos y la cámara emitirá el mensaje “Configure la cámara por punto de acceso AP o código de escaneo” (Please configure camera by AP hotspot or scanning code). (Si no hay una salida de voz, mantenga presionado el botón de reinicio de la cámara hasta que diga “reiniciar correctamente” (reset success), suelte el botón de reinicio y espere nuevamente).
En la aplicación del teléfono, haga clic en "Dispositivo agregando escaneando el código" (Device adding by scanning the code). Luego marque "Si ha finalizado los pasos anteriores, haga clic en Conectarse a la red" (If you have finished the abo-
ve steps, click Connect to the Network) y presione "Conectarse a la red" (Connect to the network). Ahora, si su teléfono móvil ya está conectado a una red wifi, mostrará su nombre de red wifi. De lo contrario, presione "Cambiar la red" (Switch the network) para abrir la WLAN de su teléfono y conectar su red disponible. Luego vuelve a la aplicación. Introduzca la contraseña de wifi (nota: esta contraseña debe ser su contraseña de wifi de la red), y luego haga clic en "Siguiente" (Next). Aparecerá un código QR en la pantalla del teléfono.

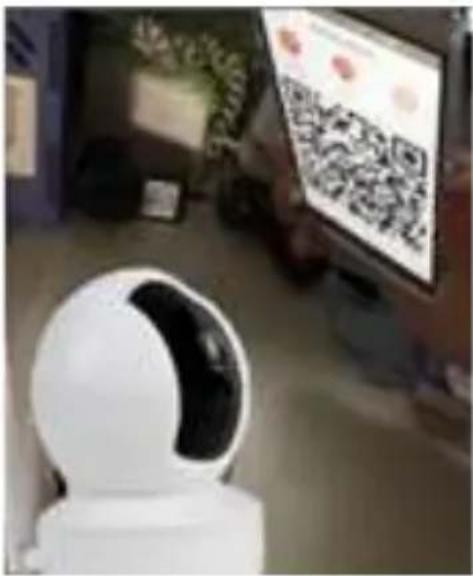
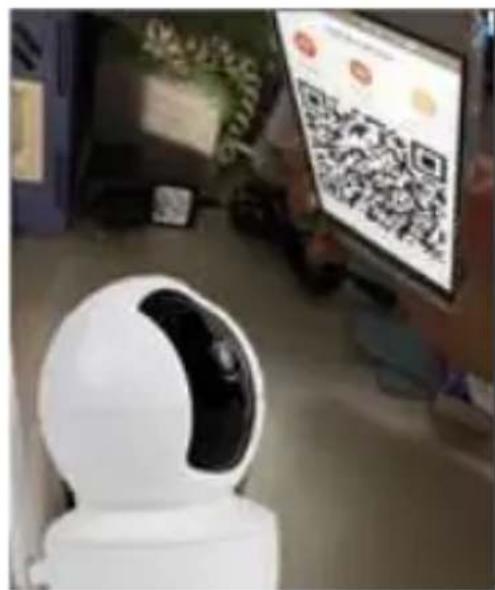
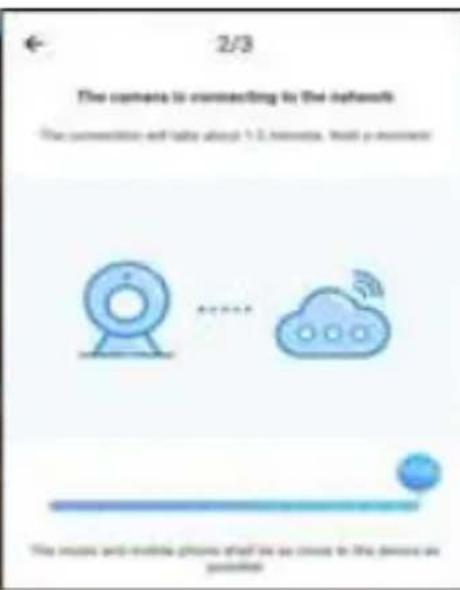
Coloque el código QR en la lente de la cámara a una distancia de alrededor de 10 \~ 20 cm. Después de que la cámara haya leído el QR, sonará con dos pitidos y una voz “Espere a que se conecte el wifi” (please wait for wifi connecting) y “Por favor, espere a que se conecte a Internet” (please wait for internet connecting). Ahora en la aplicación, presione “Escuché el beep” (I heard the beep voice). Luego, espere hasta que la voz de la cámara “Internet conectado, bienvenido a usar la cámara de
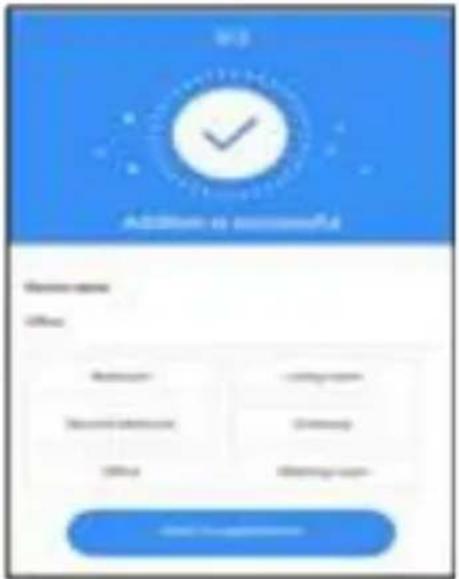
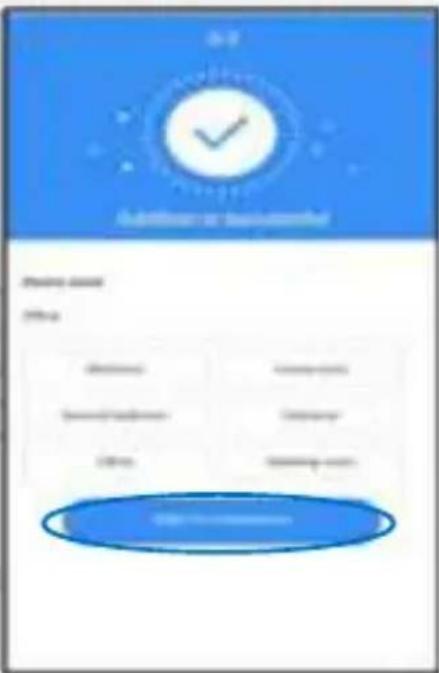
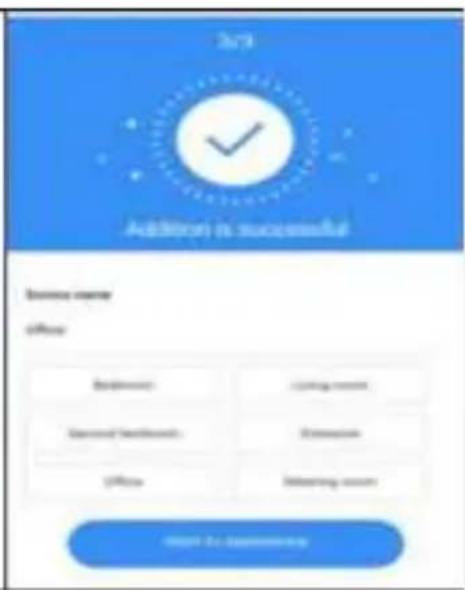
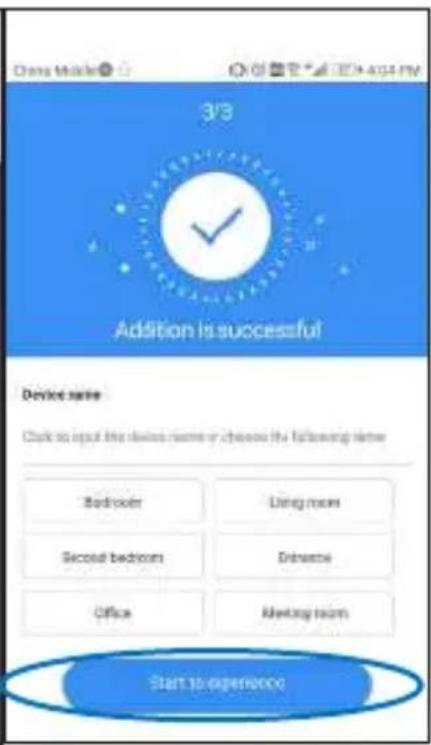
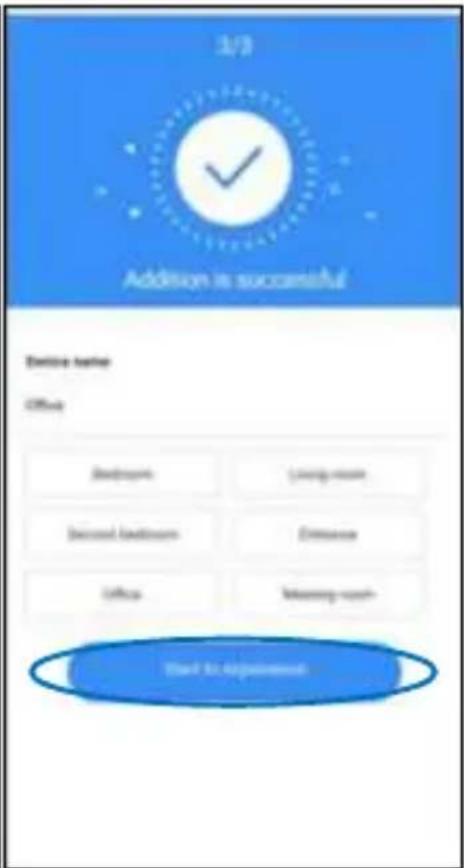
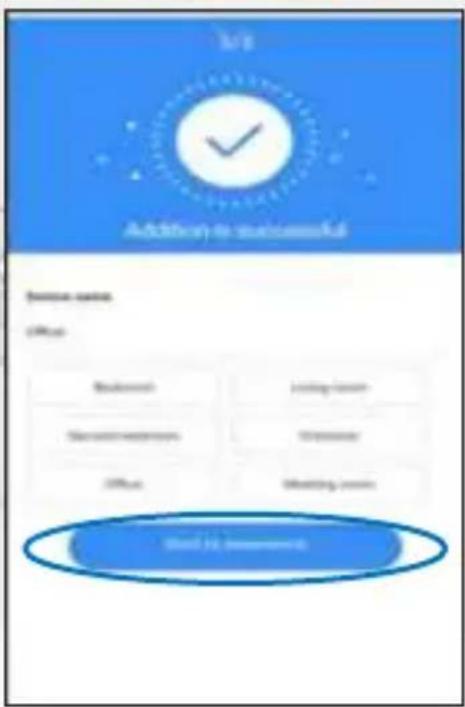
nube" (Internet connected, welcome to use cloud camera). En la aplicación también mostrará "La adición es exitosa" (Addition is successful). Presione "Comenzar a experimentar" (Start to experience) para disfrutar de la grabación de su cámara ahora.
natural_image
White robot with black eye interacting with a touchscreen display showing QR code (no readable text or symbols)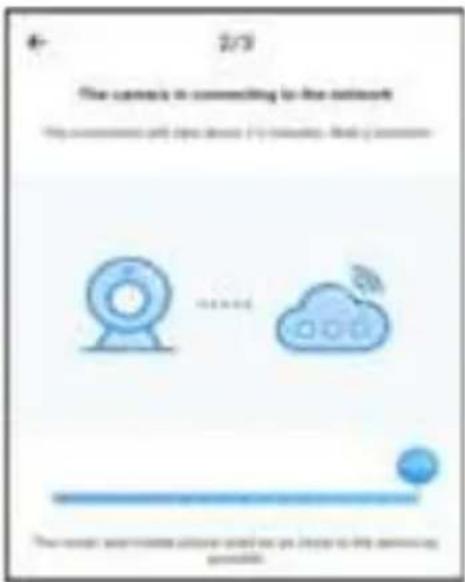
B. Agregar conectando al cable de red (solo para cámara con puerto LAN)
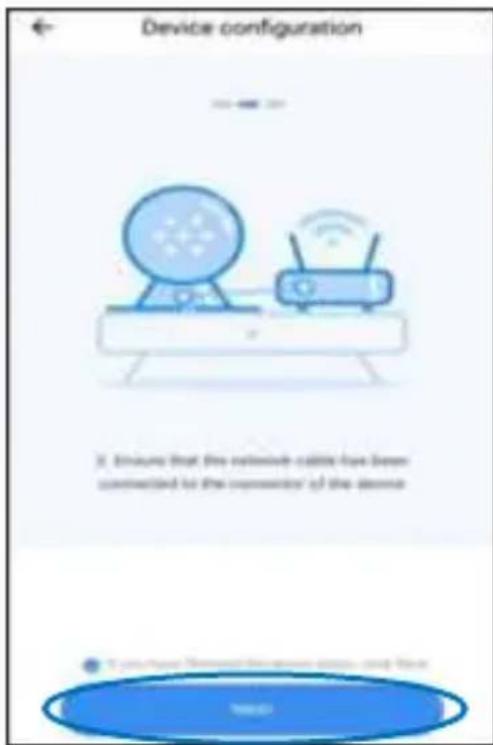
Conecte el cable de red al puerto Lan de la cámara. Luego conecte el adaptador de corriente a la cámara. La luz indicadora de Lan Port parpadea. Espere unos segundos y la cámara emitirá el mensaje "Por favor, espere la conexión por cable" (Please wait for wire connection) y "Por favor, espere la conexión a Internet" (Please wait for internet connecting). Luego dice "Por favor escanee QR en la cámara" (Please scan QR on the camera). (Si no hay una salida de voz, mantenga presionado el botón de reinicio de la cámara hasta que diga "reiniciar correctamente" (reset success), suelte el botón de reinicio y espere nuevamente.)
En la aplicación del teléfono, haga clic en "Agregar conectándose al cable de red" (Addition by connecting to network cable). Luego marque "Si ha terminado los pasos anteriores,
haga clic en Siguiente" (If you have finished the above steps, click Next) y presione "Siguiente" (Next). Entonces la aplicación llegará a escanear. Escanear el código QR en la cámara. Una vez finalizada la exploración, espere hasta que la voz de la cámara "Internet conectado, bienvenido a usar la cámara en la nube" ("Internet connected, welcome to use cloud camera). En la aplicación también mostrará "La adición es exitosa"(Addition is successful). Presione "Comenzar a experimentar" (Start to experience) para disfrutar de la grabación de su cámara ahora.

C. Adición de punto de acceso AP
Conecte el adaptador de corriente a la cámara. Espere unos segundos y la cámara emitirá el mensaje "Configure la cámara por punto de acceso AP o código de escaneo" (Please configure camera by AP hotspot or scanning code). (Si no hay una salida de voz, mantenga presionado el botón de reinicio de la cámara hasta que diga "reiniciar correctamente" (reset success), suelte el botón de reinicio y espere nuevamente)
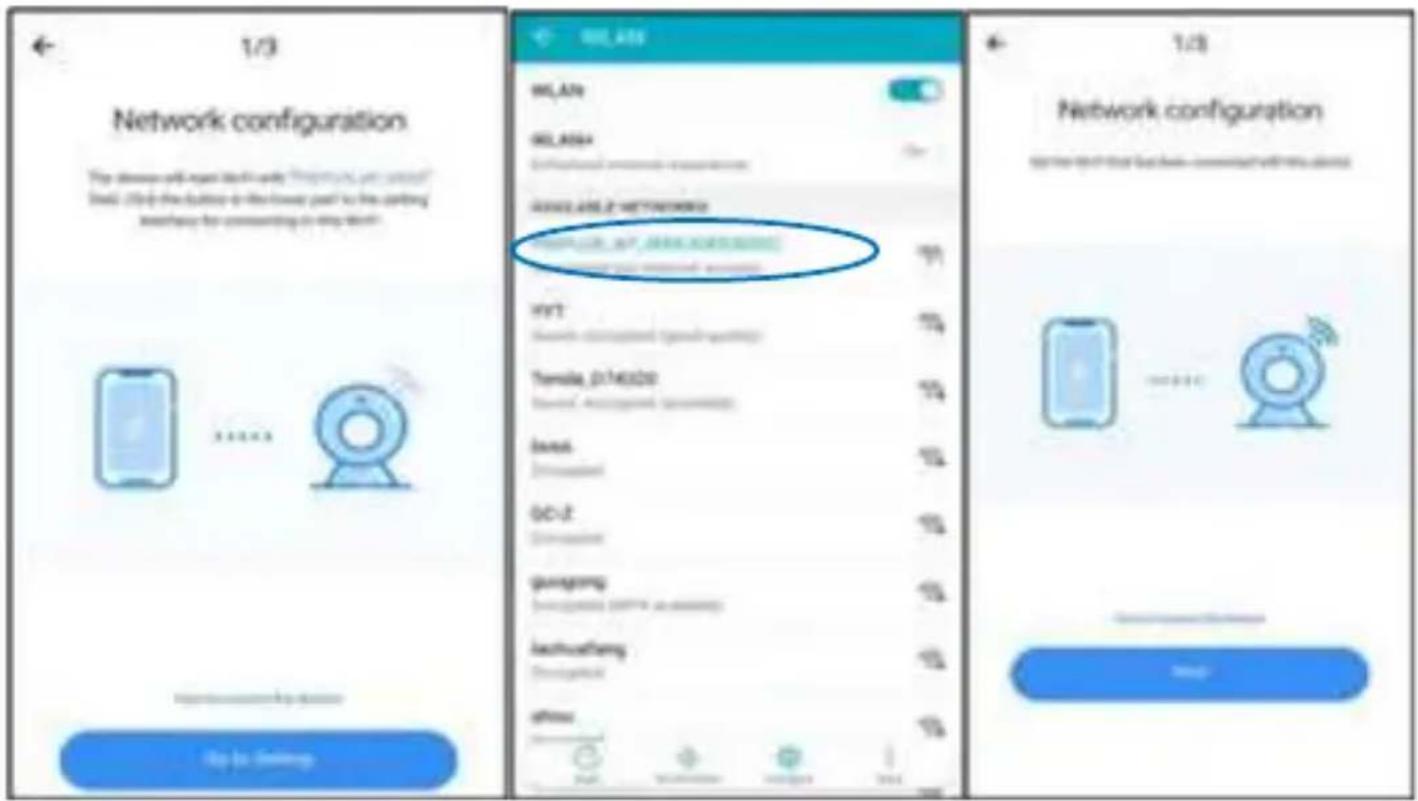
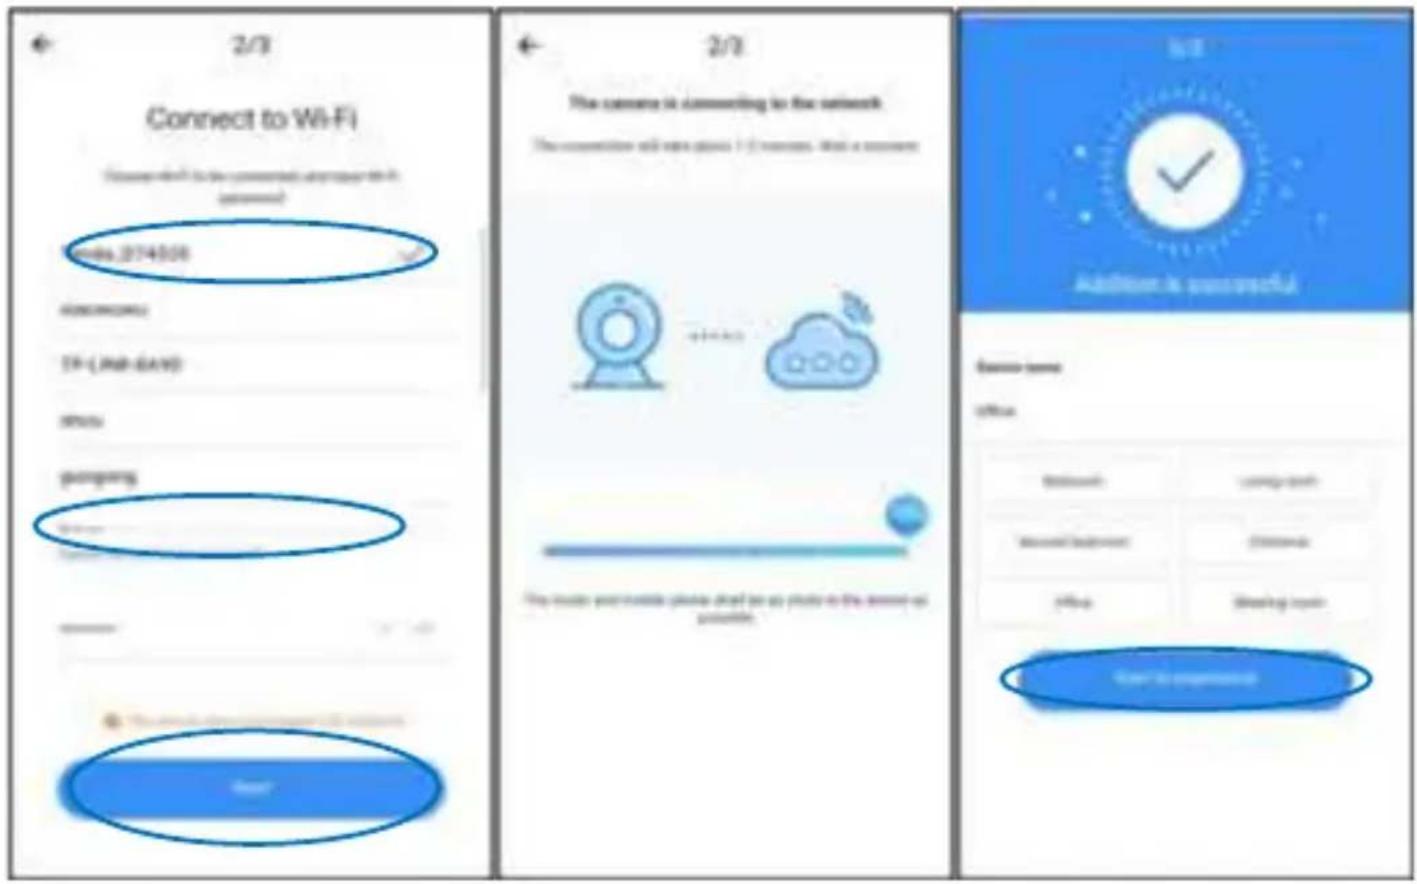
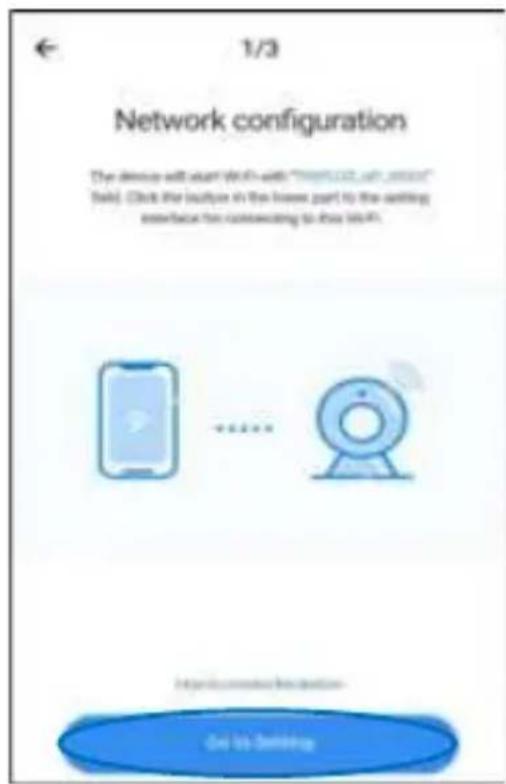
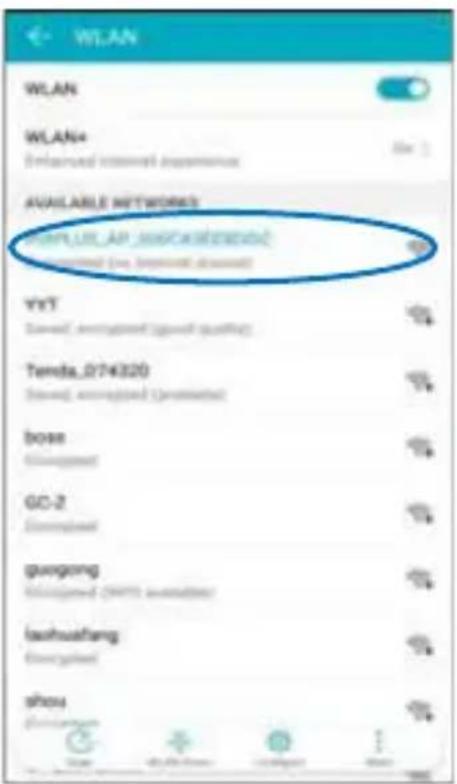
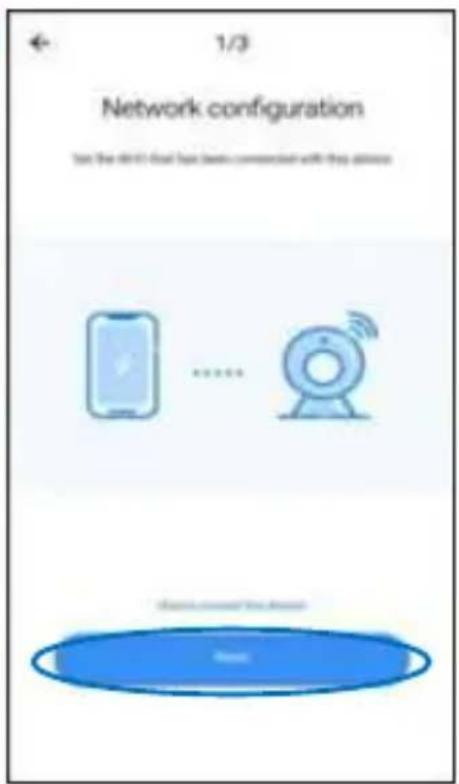
En la aplicación del teléfono, haga clic en “Agregar punto de acceso AP” (Addition of AP hotspot). Luego marque “Si ha terminado los pasos anteriores, haga clic en Siguiente” (If you have finished the above steps, click Next) y presione “Siguiente” (Next). Luego presione “Ir a Configuración” (Go to Setting). Seleccione el punto de acceso de la cámara nombrado con la red “CLOUDCAM_XXXX” y conéctelo. Después de conectar el punto de acceso de la cámara, vuelva a la aplicación y haga clic en “Siguiente” (Next).
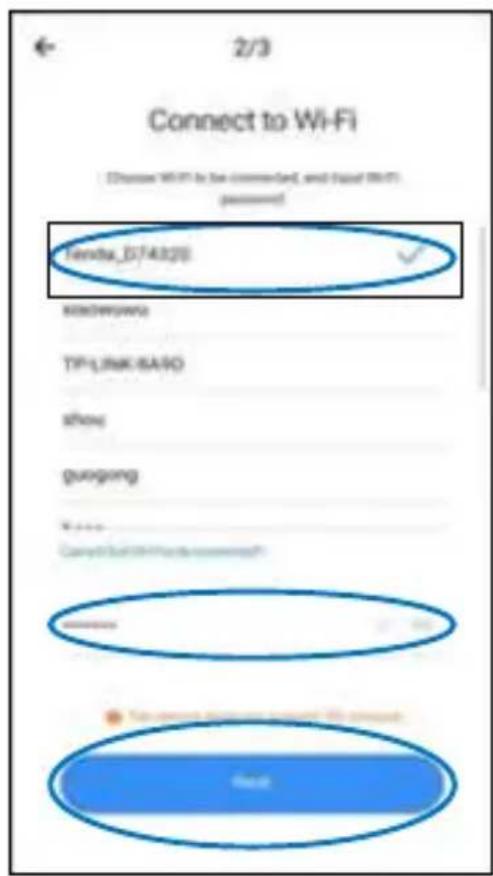
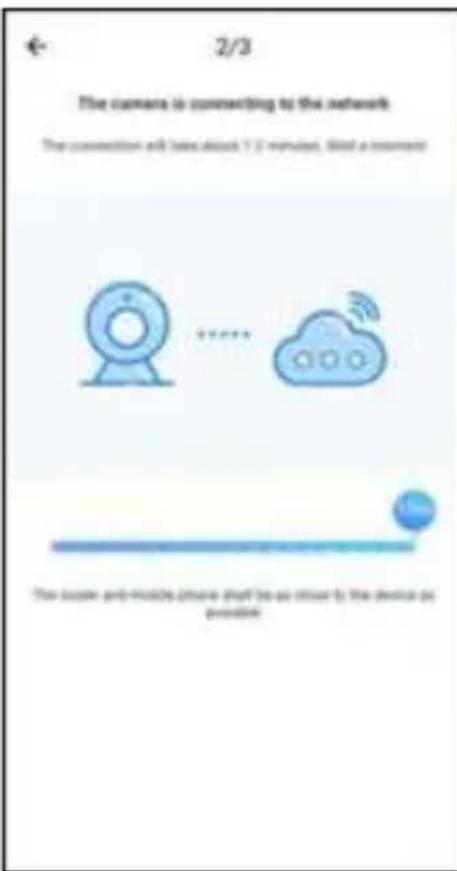
Seleccione su wifi de red e ingrese la contraseña de wifi (nota: esta contraseña debe ser su contraseña de wifi de red). Luego haga clic en "Confirmar" (Confirm), la cámara emitirá dos pitidos y una voz "espere la conexión wifi" (please wait for wifi connection) y luego la voz "espere la conexión a Internet" (please wait for internet connecting). Luego, espere hasta que la voz de la cámara "Internet conectado, bienvenido a usar la cámara de
nube" (Internet connected, welcome to use cloud camera). En la aplicación también mostrará "La adición es exitosa" (Addition is successful). Presione "Comenzar a experimentar" (Start to experience) para disfrutar de la grabación de su cámara ahora.
5. Conexión directa AP
Esta conexión es entre la cámara y el teléfono móvil directamente, no se requiere red.
Conecte el adaptador de corriente a la cámara. Espere unos segundos y la cámara emitirá el mensaje “Configure la cámara por punto de acceso AP o código de escaneo” (Please configure camera by AP hotspot or scanning code). (Si no hay una salida de voz, mantenga presionado el botón de reinicio de la cámara hasta que diga “reiniciar correctamente” (reset success), suelte el botón de reinicio y espere nuevamente)
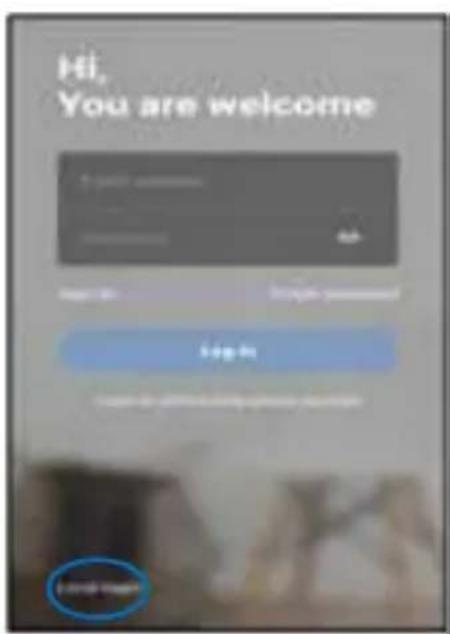
En la aplicación de teléfono, accede a la interfaz de inicio de
sesión. Si ya inició sesión, haga clic en "Mio" (Mine) en la esquina inferior derecha, luego haga clic en el icono de configuración en la esquina superior derecha y presione cerrar sesión para acceder a la interfaz de inicio de sesión. Presione "Inicio de sesión local" (Local login) y luego presione "+" en la esquina superior derecha.


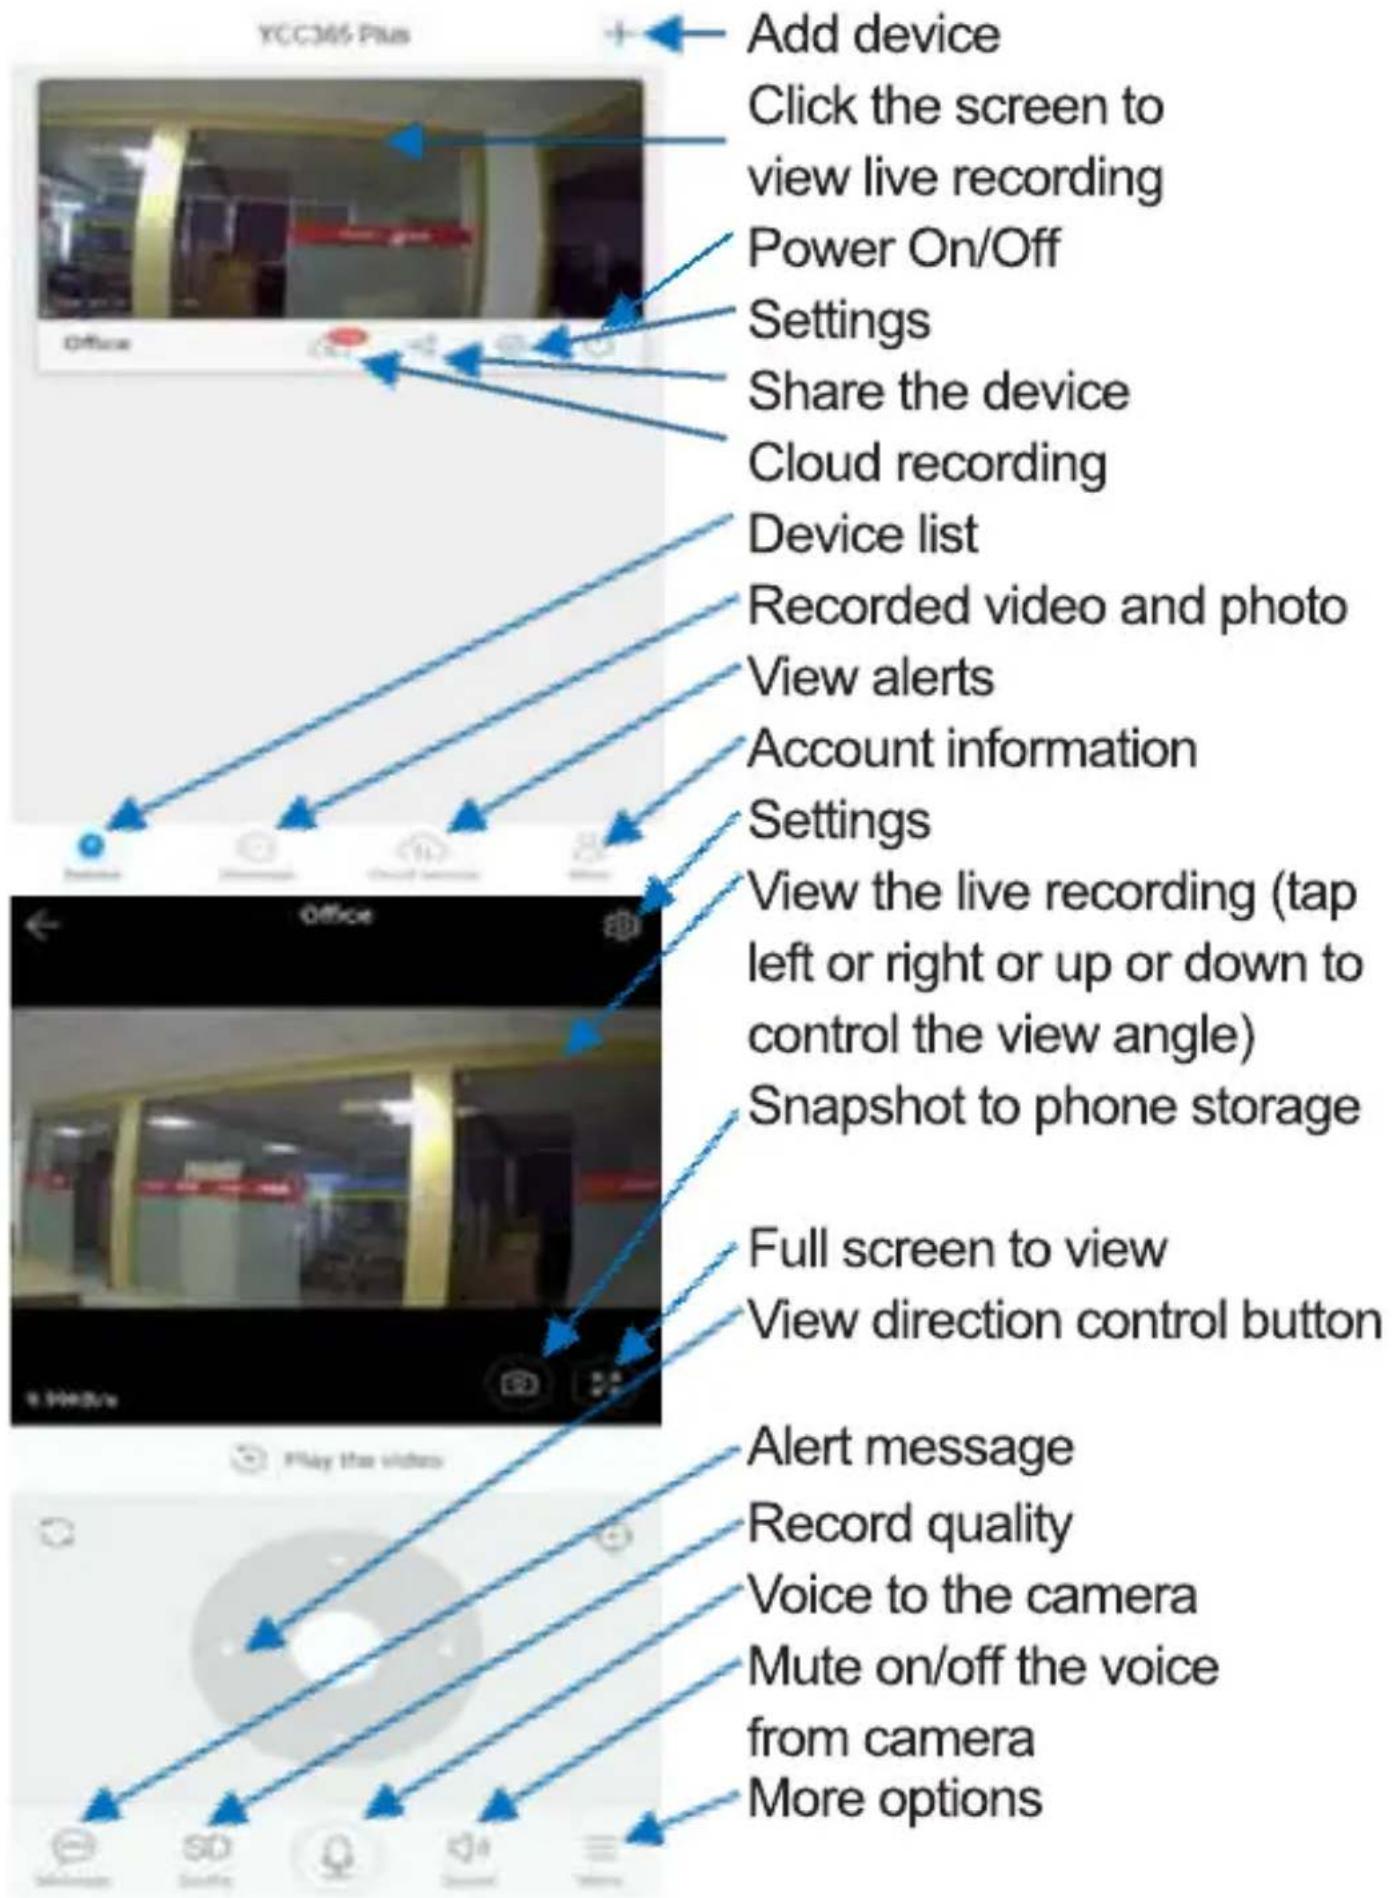
6. Iconos de operación

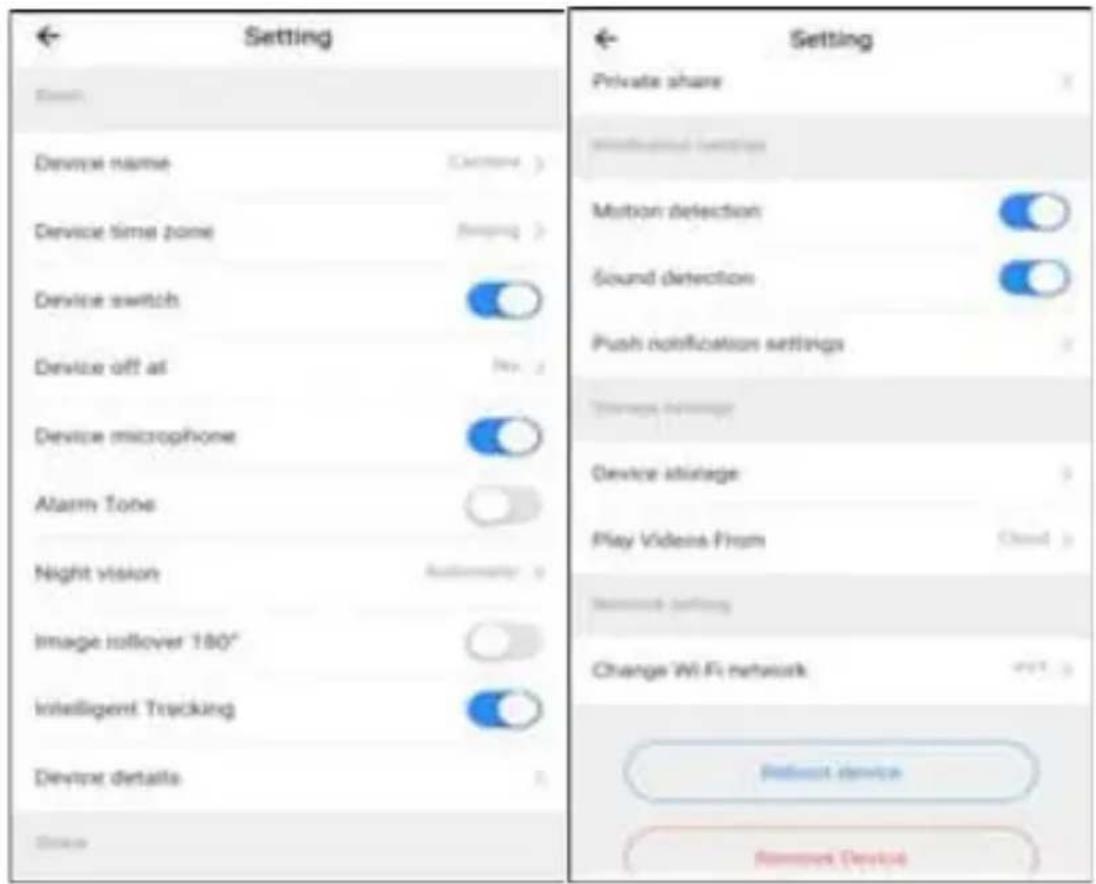
7. Ajustes
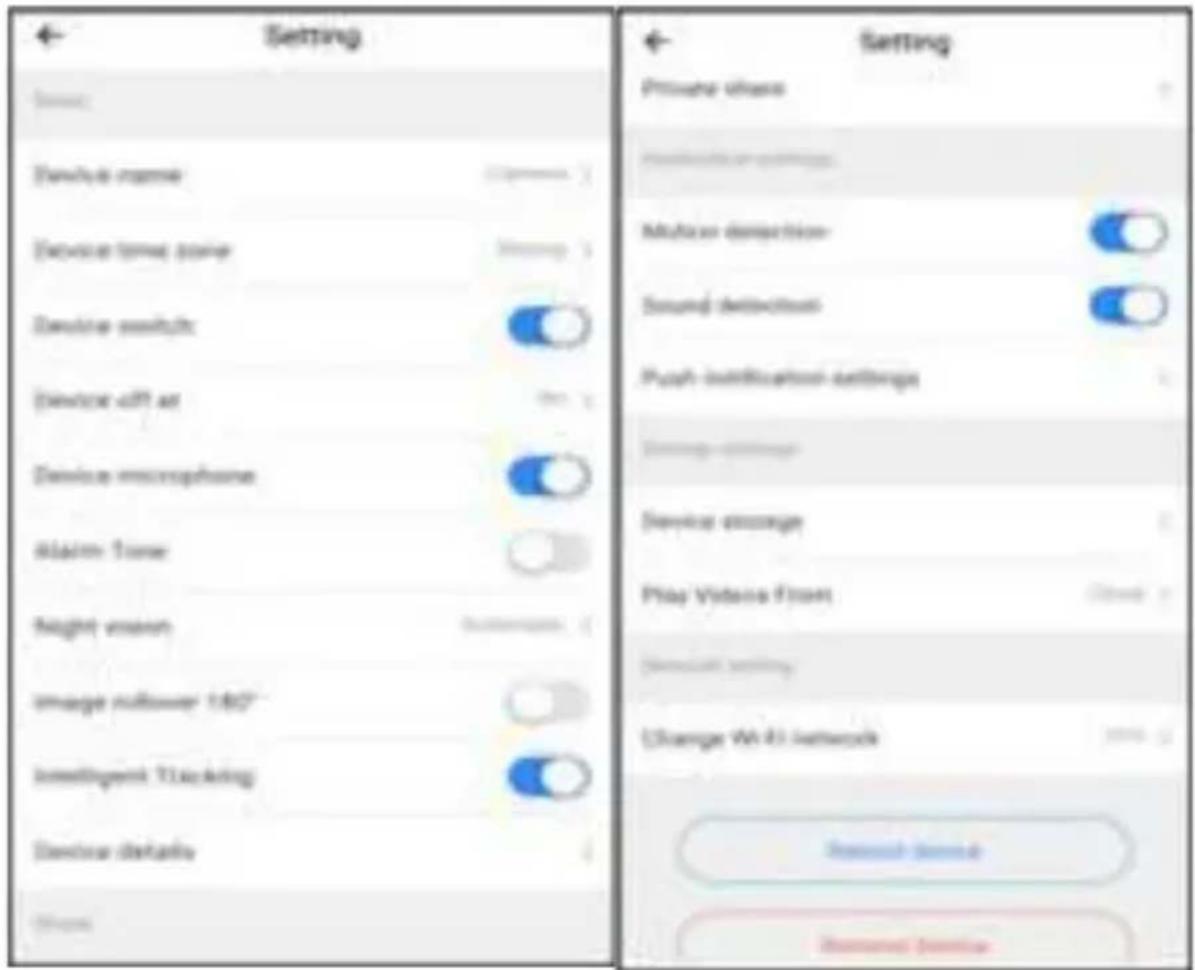
Haga clic en el botón Configuración en la esquina superior derecha de la pantalla de reproducción de video en vivo para ingresar a la página de configuración de parámetros del dispositivo.
8. Resolución de problemas y notas
Pregunta: ¿por qué la cámara no se conecta a la red Wi-Fi o fuera de línea con poca frecuencia?
Respuesta: 1. Actualmente, la cámara es compatible con Wi-Fi de red 2.4G del protocolo 802.11b / g / n. Wi-Fi 5G no es compatible.
- Asegúrese de que la cámara y el teléfono estén cubiertos en la misma área de señal wifi de la red.
- Verifique si la contraseña de la red Wi-Fi se ingresó correc-
tamente antes de escanear el código QR.
- Compruebe si la potencia y la red son normales.
- Vuelva a enchufar la alimentación y reinicie la cámara.
Nota: Cuando conecta su cámara a su teléfono a través de la aplicación "YCC365 Plus", puede detectar automáticamente el firmware más reciente y avisarle si hay una nueva actualización de firmware disponible. También puede consultar la actualización del firmware manualmente en la página de Configuración del dispositivo de la aplicación. Si acepta instalar la actualización del firmware, asegúrese de que su cámara esté conectada al adaptador de corriente antes de actualizar el firmware. No apague la cámara durante el proceso de actualización.
1. Overview of the Camera
Main Unit:
2. Download the APP
Search and download "YCC365 Plus" in Apple Store or Android app store. Or scan below QR code to download and install it.

3. Register an user account and login
Click "Sign up" to register your email as user ID and create a password according to the procedure. After registration, you can login with your registered account. If you forget your password, you can reset your password, just click "Forgot password" on the login page.
4. Add Camera with Network
Note: the camera only supports 2.4G WIFI. Before adding devices, make sure your router is 2.4G WIFI, and your phone is connected to the 2.4G WIFI router.
On mobile phone, start the app "YCC365 Plus". Click "+" on the up-right Corner to add device. Then click "Intelligent camera".
There are three ways for adding cameras: "Device adding by scanning the code", "Addition by connection to network cable" and "Addition of AP hotspot".
A. Device adding by scanning the code. (Suggest to use this way)
Connect the power adaptor to the camera. Wait a few seconds the camera will voice "Please configure camera by AP hotspot or scanning code". (If no voice out, press and hold the reset button of the camera till it voice "reset success" then release reset button and wait again.)
On phone app, click "Device adding by scanning the code". Then tick "If you have finished the above steps, click Connect to the Network" and press "Connect to the network". Now If your mobile phone already connected network wifi, it will show your network wifi name. If not, press "Switch the network" to open your phone's WLAN and connect your available network. Then go back to the app. Input wifi password (note: this password must be your network wifi password), and then click "Next". A QR code will show on phone screen.
Place the QR code to the camera lens at a distance of around 10\~20cm. After the camera read the QR, it will sound with two beeps and voice "please wait for wifi connecting" and "please wait for internet connecting". Now on app, press "I heard the beep voice". Then wait till the camera voice "Internet connected, welcome to use cloud camera". On app it will also show "Addition is successful". Press "Start to experience" to enjoy your camera recording now.
B. Add by connecting to network cable (Only for Camera with Lan Port)
Connect the network wire to the Lan port on camera. Then connect the power adaptor to the camera. The Lan Port indicator light flashes. Wait a few seconds the camera will voice "Please wait for wire connection" and "Please wait for internet connecting". Then it voices "Please scan QR on the camera". (If no voice out, press and hold the reset button of the camera till it voice "reset success" then release reset button and wait again.) On phone app, click "Addition by connecting to network cable". Then tick "If you have finished the above steps, click Next" and press "Next". Then the app will get to scan. Scan the QR code on the camera. After scanning finished, please wait till the camera voice "Internet connected, welcome to use cloud camera". On app it will also show "Addition is successful". Press "Start to experience" to enjoy your camera recording now.

C. Addition of AP hotspot
Connect the power adaptor to the camera. Wait a few seconds the camera will voice "Please configure camera by AP hotspot or scanning code". (If no voice out, press and hold the reset button of the camera till it voice "reset success" then release reset button and wait again.)
On phone app, click "Addition of AP hotspot". Then tick "If you have finished the above steps, click Next" and press "Next". Then press "Go to Setting". Select the camera hotspot named with "CLOUDCAM_XXXX" network and connect it. After connect the camera hotspot, go back to the app and click "Next".
Select your network wifi and input wifi password (note: this password must be your network wifi password). Then click "Confirm", the camera will sound with two beeps and voice "please wait for wifi connection" and then voice "please wait for internet connecting". Then wait till the camera voice "Internet connected, welcome to use cloud camera". On app it will also
show "Addition is successful". Press "Start to experience" to enjoy your camera recording now.
5. AP Direct connection
This connection is between camera and mobile phone directly, no network required.
Connect the power adaptor to the camera. Wait a few seconds the camera will voice "Please configure camera by AP hotspot or scanning code". (If no voice out, press and hold the reset button of the camera till it voice "reset success" then release reset button and wait again.)
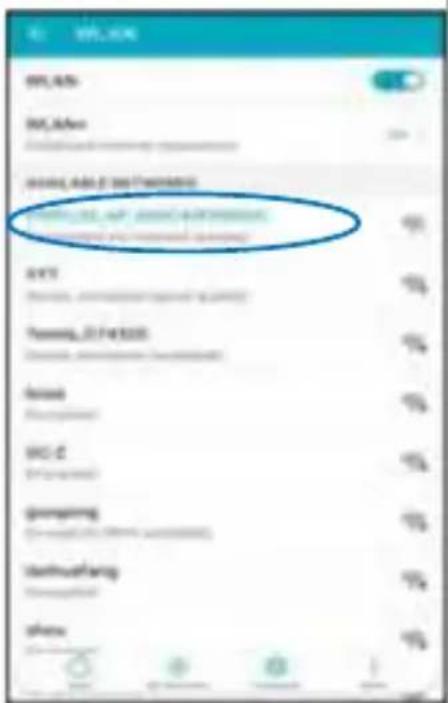
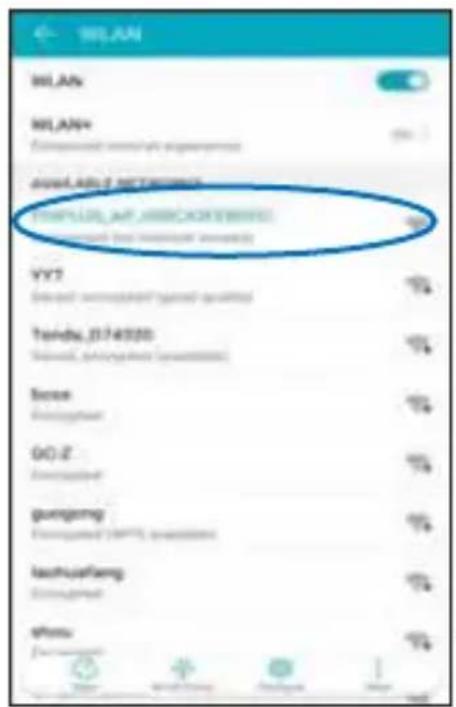
On phone app, get to the login interface. If you already login, please click "Mine" on lower-right corner then click setting icon on up-right corner and press log out, then you will get to login interface. Press "Local login" then press "+" on the up-right corner to add device. Press "Next", "Confirm" and "Go to Setting".
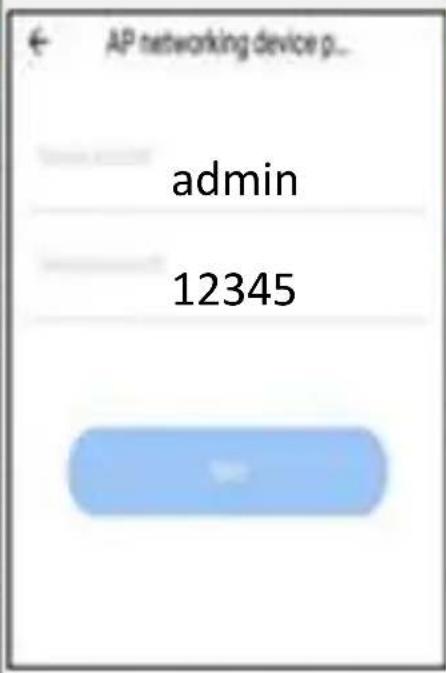
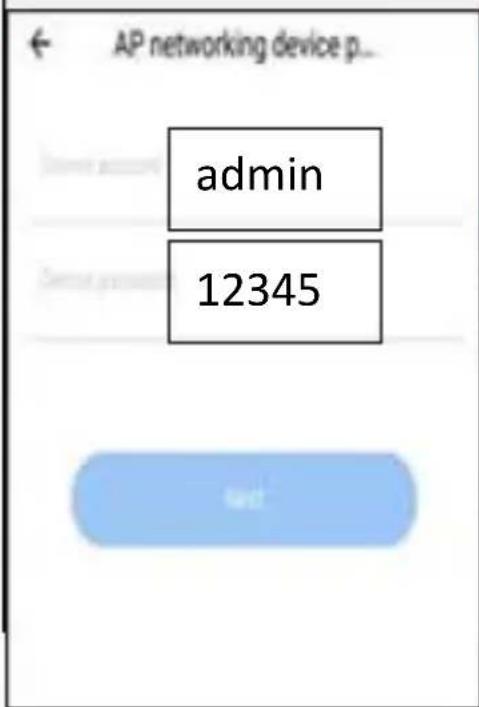
Select the camera hotspot named with "CLOUDCAM_XXXX" network and connect it. After connect the camera hotspot, go back to the app and click "Next". Type in device account with "admin" and device password with "12345", then press "Next". Press "Start to experience" to enjoy your camera live view now.


6. Operation Icons
7. Settings
Click the Settings button in the up-right corner of the live video playback screen to enter the device parameter setting page.
8. Trouble Shootings and Notes
Ask: why doesn't the camera connect to the Wi-Fi network or off line sub-normally?
Answer: 1. Currently, the camera supports 2.4G network Wi-Fi of the 802.11b /g/n protocol. 5G Wi-Fi is not supported.
- Please ensure that the camera and phone is covered in the same network wifi signal area.
- Check whether the network Wi-Fi password is entered correctly before scanning the QR code.
- Check whether the power and network are normal.
- Re-plug the power and reset the camera to restart.
Note: When you connect your Camera to your phone through the "YCC365 Plus" app, it may automatically detect the latest firmware and prompt you if a new firmware upgrade is available. You can also check the firmware update manually in Device Settings page of the app. If you accept to install the firmware upgrade, make sure that your camera is connected to the power adapter before upgrading the firmware. Do not power off the camera during the upgrade process.
Qian S.A. de C.V., garantizará este producto en todos sus componentes y mano de obra durante el periodo de 12 meses, contando a partir de la fecha de adquisición contra cualquier defecto de fabricación y funcionamiento durante el uso normal y doméstico de este producto.
Qian S.A. de C.V. garantiza al comprador la ausencia de anomalías de fabricación y funcionamiento incluyendo piezas y componentes del producto o en lo referente a materiales.
- Esta póliza ampara únicamente productos comercializados por Qian S.A. de C.V., a través de sus distribuidores autorizados dentro de la República Mexicana y los Estados Unidos de América.
- Para la validación de ésta se deberá presentar el producto defectuoso junto con la presente póliza de garantía completamente llenada y sellada por el distribuidor que realizó la venta o la factura, recibo, o comprobante de compra en el lugar donde se aquirió el producto, o en el Centro de Servicio Nacional.
| Producto: | Sello del Distribuidor |
| Fecha de Compra: | |
| Modelo: | |
| Marca: Qian.mx |
- Qian S.A. de C.V. podrá utilizar piezas nuevas, restauradas o usadas en buenas condiciones para reparar o reemplazar cualquier producto, sin costo adicional para el consumidor, siempre y cuando el periodo de garantía estipulado en la pre-
sente póliza no se haya terminado.
-
En caso de que el producto no tenga reparación, se generará el cambio por un producto similar o de características superiores.
-
El tiempo de reparación no será mayor de 30 días naturales a partir de la fecha de recepción del producto por parte de Qian S.A. de C.V. o en su Centro de Servicio Autorizado.
-
Qian S.A. de C.V. cubrirá los gastos de envío requeridos para la presentación del producto dentro de la red de centros de servicio autorizados.
Exclusions:
Qian S.A. de C.V. no hará valida esta póliza de garantía en los siguientes casos:
- Cuando el producto se hubiese utilizado en condiciones distintas a las normales.
- Cuando el producto no se hubiese operado de acuerdo al instructivo de uso que lo acompaña.
- Cuando el producto hubiese sido alterado o reparado por personas no autorizadas por parte de Qian S.A. de C.V.
Para hacer válida la garantía, así como la adquisición de componentes, partes consumibles y accesorios pueden solicitar información en www.qian.mx o dirigirse a cualquier Centro de Servicio Autorizado Qian S.A. de C.V.
MÉXICO
Centro de Servicio Autorizado para Garantía Qian S.A. de C.V
Calz. José Guadalupe Gallo #8490-A,
Col. Agua Blanca Industrial, Zapopan, Jalisco, México. C.P. 45235
Tel. +52.33.1078.3404
Centro de Servicio Autorizado para
Componentes, Consumibles y Accesorios Qian S.A. de C.V.
Calz. José Guadalupe Gallo #8490-A,
Col. Agua Blanca Industrial, Zapopan, Jalisco, México. C.P. 45235
Tel. +52.33.1078.3404
ESPAÑA
Centro de Servicio Autorizado para Garantía GRUPO VADETO
CL Manuel Tovar N° 16, 28034
Madrid Tel. +34 911.630.942
Centro de Servicio Autorizado para
Componentes, Consumibles y Accesorios GRUPO VADETO
CL Manuel Tovar N° 16, 28034
Madrid Tel. +34 911.630.942
USA
Centro de Servicio Autorizado para Garantía GRUPO VADETO
10065 Via de la Amistad A2,
San Diego, CA 92154
Tel. +1 619.271.0384
Centro de Servicio Autorizado para
Componentes, Consumibles y Accesorios GRUPO VADETO
10065 Via de la Amistad A2,
San Diego, CA 92154
Tel. +1 619.271.0384
Advertencias en materia de seguridad de Corriente Continua (DC)

ADVERTENCIA: Coloque la YAN Cámara Inalámbrica Mini PTZ 1080p con Audio cerca de una toma de corriente continua. El cable de alimentación de corriente continua es el medio principal de desconexión de su cámara y debe estar siempre al alcance. Conecte el cable de alimentación únicamente a tomas de corriente con conexión a tierra para evitar el riesgo de descarga eléctrica.

ADVERTENCIA: Desconecte siempre el cable de alimentación de corriente continua cuando instale o quite la cubierta de la cámara.

ADVERTENCIA: No ponga en marcha la cámara sin la cubierta.

ADVERTENCIA: El usuario no debe realizar ningún tipo de reparación de la fuente de alimentación. Para evitar daños a la fuente de alimentación, confíe su reparación o reemplazo sólo a una persona calificada. El usuario puede efectuar el mantenimiento del resto de los componentes.
CONSUMO ENTRADRA5VAcc52Acc 2A
Qian S.A. de C.V. will warranty this product in all its components and workmanship for the period of 12 months, counting from the date of purchase against any defects in manufacture and functionality of the product, during normal and domestic use.
Qian S.A. de C.V. guarantees the buyer the absence of any manufacturing and
operation anomalies, including parts, components or materials of the product.
-
This policy guarantees only products marketed by Qian S.A. de C.V., through its authorized distributors within the Mexican Republic and United States of America.
-
This warranty must be presented with the defective product in order to be valid, completely filled out and stamped by the distributor that made the sale, invoice or receipt, or proof of purchase in the place where it was bought or the National Service Center.
| Product: | Distributor Seal |
| Date of Purchase: | |
| Model: | |
| Brand: Qian.mx |
- Qian S.A. de C.V. may use new, refurbished or used parts
that are in good condition to repair or replace any product, at no additional cost to the consumer, as long as the warranty period specified in this policy has not been completed.
-
If the product is not repairable, it will be exchanged for a similar product or with superior characteristics.
-
The time for repair will not exceed 30 natural days from the date the product was received by Qian S.A. de C.V. or its Authorized Service Center.
-
Qian S.A. de C.V. will cover shipping costs required for presentation of the product within the network of our Authorized Service Centers.
Exclusions:
Qian S.A. de C.V. will not validate this warranty policy in the following cases:
- When the product has not been used under normal conditions.
- When the product has not been operated according to the instructions that were included.
- When the product has been altered or repaired by any unauthorized Qian S.A. de C.V. personnel.
Visit www.qian.mx for warranty purposes, as well as purchase of components, consumable parts and accessories or contact any Qian S.A. de C.V. Authorized Service Center.
MEXICO
Qian S.A. de C.V. Authorized Service Center Warranty
Calz. José Guadalupe Gallo #8490-A,
Col. Agua Blanca Industrial, Zapopan, Jalisco, México. C.P. 45235
Tel. +52.33.1078.3404
Authorized Service Center for
Components, Consumables and
Accessories Qian S.A. de C.V.
Calz. José Guadalupe Gallo #8490-A,
Col. Agua Blanca Industrial, Zapopan, Jalisco, México. C.P. 45235
Tel. +52.33.1078.3404
SPAIN
GRUPO VADETO
Authorized Service Center Warranty
CL Manuel Tovar N° 16, 28034
Madrid Tel. +34 911.630.942
Authorized Service Center for
Components, Consumables and
Accessories GRUPO VADETO
CL Manuel Tovar N° 16, 28034
Madrid Tel. +34 911.630.942
USA
GRUPO VADETO
Authorized Service Center Warranty
10065 Via de la Amistad A2,
San Diego, CA 92154
Tel. +1 619.271.0384
Authorized Service Center for
Components, Consumables and
Accessories GRUPO VADETO
10065 Via de la Amistad A2,
San Diego, CA 92154
Tel. +1 619.271.0384
Warnings regarding the safety of Direct Current (DC)

WARNING: Place the YAN Wireless PTZ Mini Camera 1080p with Audio near a DC power outlet. The DC power cord is the main means of disconnecting your camera and should always be within reach. Connect the power cord only to grounded outlets to avoid the risk of electric shock.

WARNING: Always disconnect the DC power cord when installing or removing the camera cover.

WARNING: Do not operate the camera without the cover.

WARNING: The user should not perform any type of repair of the power supply. To avoid damage to the power source, entrust your repair or replacement to only a qualified person. The user can carry out the maintenance of the rest of the components.
CONSUMPTION INPUT:6V6DO2A

natural_image
Abstract red logo with a white stylized 'X' inside a circular design (no text or symbols)ian®.mx
- YAN Cámara Inalámbrica Mini PTZ 1080p con Audio / YAN Wireless PTZ Mini Camera 1080p with Audio
- MODELO/MODEL QCY-62401
- MANUAL DE USUARIO / USER MANUAL
- Cámara Wifi Con Almacenamiento en Nube Operación Manual
- Descripción de la cámara
- Descarga de la App
- Registar una cuenta de usuario e iniciar sesión
- Añadir cámara con red
- Dispositivo que agrega escaneando el código. (Sugerir para usar de esta manera)
- Agregar conectando al cable de red (solo para cámara con puerto LAN)
- Adición de punto de acceso AP
- Conexión directa AP
- Iconos de operación
- Ajustes
- Resolución de problemas y notas
- Overview of the Camera
- Download the APP
- Register an user account and login
- Add Camera with Network
- Device adding by scanning the code. (Suggest to use this way)
- Add by connecting to network cable (Only for Camera with Lan Port)
- Addition of AP hotspot
- AP Direct connection
- Operation Icons
- Settings
- Trouble Shootings and Notes
- Exclusions:
- MÉXICO
- ESPAÑA
- USA
- MEXICO
- SPAIN
Mærke : Qian
Model : QCY-62401
Kategori : Overvågningskamera